As a website owner you should definitely know how to add a contact form to your site. Most people will want to know who’s behind your website, and have a way to reach out, if need be.
Contact forms give your visitors an easy way to get in touch with you. Without a contact form, all you can do is list your email address and hope your visitors know what to do next.
Below you’ll learn about the benefits of adding a contact form to your site, what to look for in a contact form plugin, how to ensure privacy and compliance, and finally a walkthrough that’ll show you how to install and setup a quality contact form plugin.
What is a Contact Form?
If you’ve spent any time online, then you’ve probably used a contact form. Contact forms are an easy way to get in touch with a website owner. As a website owner yourself, a contact form makes your site seem more professional than simply listing an email address.
Contact forms come in many shapes and sizes, but here’s generally what they’ll look like:
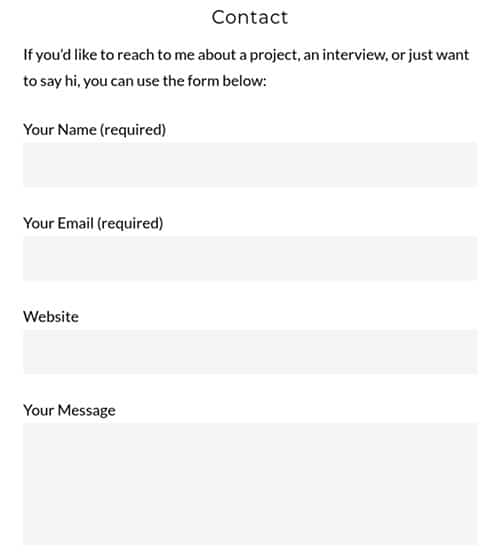
WordPress contact form plugins make it easy to add a contact form to your site. Beyond having a super basic contact form you can also customize your form to add options that are unique to your site.
If you’re not afraid to edit a little bit of code you can even customize your contact form to match the design of your existing site.
Benefits of Adding a Contact Form to Your WordPress Site
By adding a contact form to your WordPress site you’ll realize a ton of different benefits. A contact form seems simple in nature, but it offers all kinds of benefits you may not even think of.
Here’s a look at the biggest benefits you’ll receive when adding a contact form to your site:
1. Better Spam Protection
No matter the size of your website you’re going to experience some form of email spam. The larger your website becomes the worse this issue with getting. Especially, if all you’re doing is listing your email address on your website. Oftentimes scammers will use a bot to scan the web and pick up any listed email address and add it to a list. A contact form allows you to hide your email address, and keep it protected.
If you’ve been lucky and haven’t experienced email spam, then you’ve probably received a handful of spam comments. This is a common issue with WordPress sites and most websites in general.
To combat email spam and keep your sanity intact you’ll want to utilize a WordPress contact form.
Most WordPress contact form plugins will have built-in spam protection. It’s not perfect, but it’s a solid line of defense that’ll keep most spam emails from landing in your inbox.
2. Receive Higher Quality Emails
If you want people to reach out to you regarding the services or products you offer, then you’ll usually require specific information. Without a contact form, it might take multiple emails back and forth to obtain the right information.
But, with a contact form, you can get all the information you require in the very first email. You can do this by creating a contact form that have required fields. In order for the email to successfully send the user will have to input all of the required fields.
Then, once the email shows up in your inbox you’ll have all of the information you require. This allows you to filter out requests and only spend time on those that matter.
3. Set Communication Expectations
The access to digital communication and our always-on culture has changed our communication expectations. Most people demand and expect a rapid response. But, when you’re running a popular website this probably won’t be possible.
Instead of leaving your users hanging you can use your contact form to set communication expectations. For example, you can notify your users to the expected email response time, or you can specify the type of emails you’re looking for, and those you won’t reply to.
Since the rise of guest blogging, a lot of websites will specify that they no longer take guest posts, or that they’ll only respond to blogs or pitches they’re actually interested in publishing.
Use your contact form to specify what types of emails you’ll actually respond to.
What to Look for in a Contact Form Plugin?
When you’re installing a contact form plugin (or any plugin for that matter) on your site, there’s a series of steps you’ll want to go through first. It’s not uncommon to get “plugin happy” and install dozens of plugins on your WordPress site.
Although it’s fun adding new features and testing things out, this can lead to a decline in performance and even leave your site open to more security risks. The more plugins you have installed the more backdoors you’re leaving open for a potential threat to exploit.
For that reason, it’s a good idea to take a minimalist approach to installing plugins by only installing and activating those that are absolutely necessary. Once you’ve deemed a plugin worthy, then you’ll want to make sure that it’s high quality.
Here are a few WordPress plugin quality indicators:
- Average ratings and user reviews. Plugin ratings are shown on every single plugin page. It’s a good idea to only go with plugins that receive an average of four stars or higher. User reviews will help to give context to the ratings and illuminate any glaring problems with the plugin.
- The number of active installs. Generally, the higher the number of active installs, the better the plugin. However, you might be able to find a brand new plugin that’s incredible but just hasn’t gained any traction yet.
- The frequency of updates. You’ll want to choose a plugin that’s updated on a regular basis. This shows how active the developer is in maintaining the plugin and ensure ongoing WordPress compatibility.
- Plugin support. There’s a support tab within the plugin page that’ll show you how active the developer is in responding to plugin issues. Also, keep an eye out for external support forums, as well as additional plugin documentation.
Now that you know what makes a WordPress plugin high-quality let’s look at a few features you’ll want to look for in a contact form plugin:
- Easy to use. There’s no point in installing a plugin if you can’t figure out how to use it. Most plugins are simple enough, but some are needlessly complicated. Unless you have the programming skills it’s smart to learn towards a plugin that’s almost too simple to use.
- Various form types. Chances are you might want more than just a contact form, whether now or into the future. Look for a versatile plugin that’ll help you create an awesome contact form, but offer more form types if the need arises.
- Ability to grow. Look for plugins that offer extensions, add-ons, or even premium versions. You might not need these features now, but they could become valuable in the future. Plus, you won’t have to switch plugins as your needs change.
Best WordPress Contact Form Plugins
By now you understand the importance of adding a contact form to your site and how it can make your working life so much easier.
Here are some of the top WordPress contact plugins available on the market today. Like most things WordPress you’ll find a handful of incredible plugins for any feature you want to add to your site.
Here are five top WordPress contact form plugins worth considering:
1. WPForms ( Free )
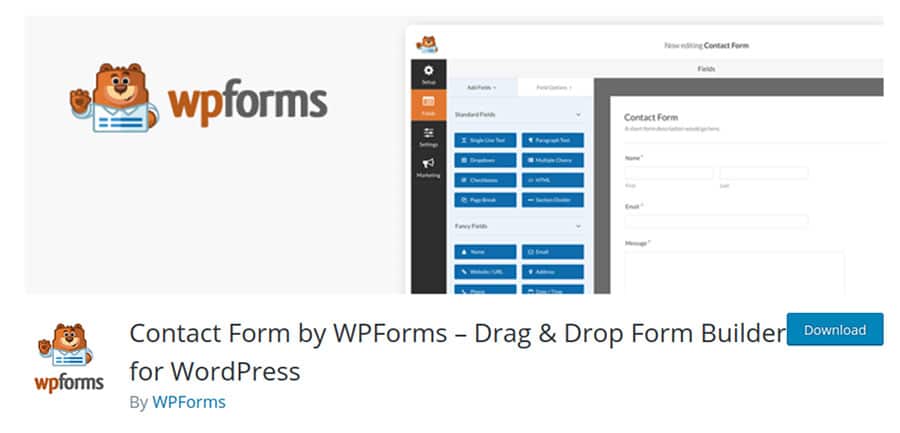
WPForms is a featured-packed contact form plugin that’s also very easy to use. A pretty rare combination indeed. It’s a very versatile plugin that can be used to create a myriad of forms, including contact forms.
It uses a drag and drop builder to create the forms, so you can create beautiful and functional forms without having to code.
There’s also a premium version of the plugin available. But, the free version should suffice for most website owners. With the lite version of the plugin, you’ll get features like the ability to create unique form fields, spam protection, and thank you page redirection.
2. Ninja Forms ( Freemium )
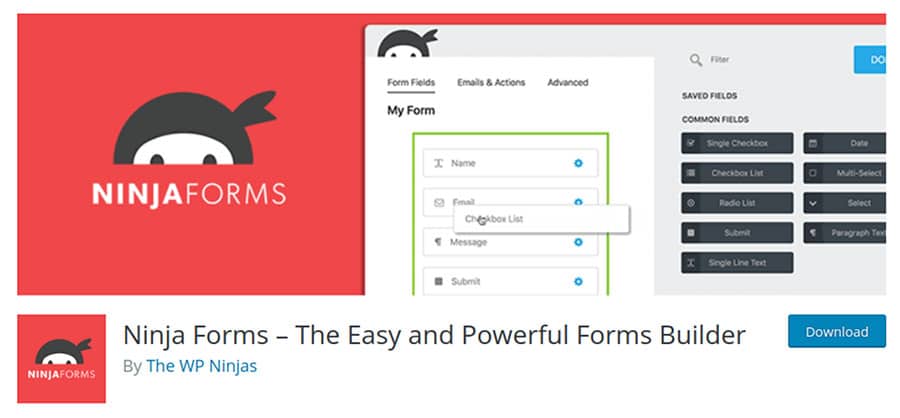
Ninja Forms is a solid free WordPress form plugin. Even though it’s totally free, you’ll find it packed with tons of features. With this plugin, you can create a myriad of different forms, from surveys to subscriber sign up forms, to the type of contact forms we’re going to create in this post.
All of your form customizations are handled through the drag and drop interface. Once you’re satisfied with your form, just add it to your site via a shortcode.
The free version should be enough for most users, but there’s also a paid version available for those who demand even greater functionality.
3. Jetpack ( Free )

Jetpack is a versatile plugin created by Automattic (the team behind WordPress). It’s equipped with multiple modules you can activate to turn on certain features, one of those being a contact form module.
Once you enable the module you’ll be able to create forms right within your WordPress post and page editor. It allows you to create simple contact forms with the ability to add and remove whatever forms fields you’d like. If you’re already using Jetpack on your site this is a fast and easy way to add a contact form to your site.
4. Contact Form 7 ( Free )

Contact Form 7 is one of the top contact form plugins out there. It remains not only the oldest but the most downloaded contact form plugin in the WordPress plugin repository.
This plugin lets you build basic contact forms and easily embed them into your site via shortcode. You can create fairly basic forms without any HTML knowledge, but if you want to unlock more customization options, then you’ll need to know HTML. Still, even without any prior HTML knowledge, the plugin is simple enough to figure out.
Since it’s so long-running you’ll find a wealth of tutorials online that’ll help you further customize your contacts forms to your liking. Plus, it’s entirely free.
5. Gravity Forms ( Premium )
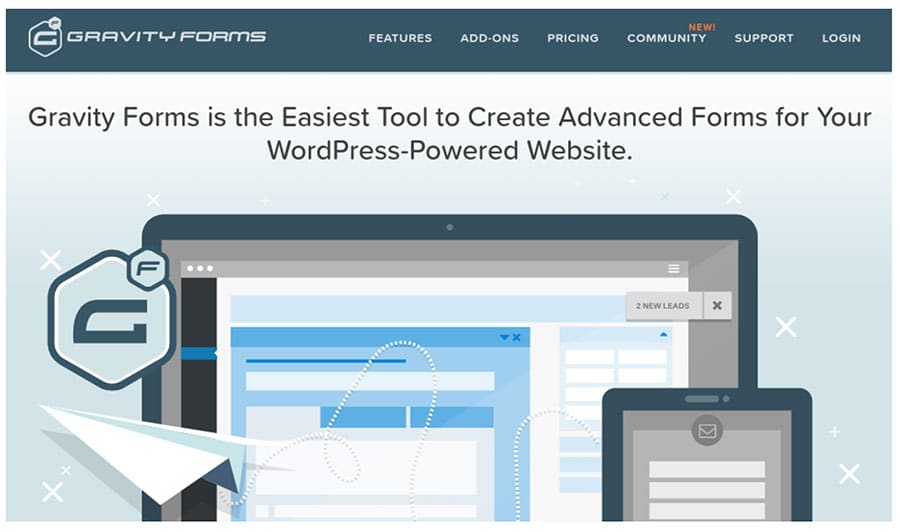
Gravity Forms is a premium WordPress form plugin. Since you’re paying right out of the gate you’ll find a ton of advanced features.
All form customizations are handled through a drag and drop builder, which makes it very easy to build whatever kind of form you’d like. Beyond contact forms, you’ll find a wealth of add-ons that allow you to create things like quizzes, surveys, and a ton more.
Also, since it’s a premium plugin you’ll get access to dedicated support staff, along with in-depth tutorials, resources, a knowledgebase, and a forum.
Any plugin from the list above will be a solid choice. Keep in mind that you only need one contact form plugin for your site. For the sake of the tutorial and setup process below, we’ll be using the Ninja Forms plugin, but the steps will be similar for any plugin you decide to use.
WordPress Contact Forms and GDPR Compliance
Before we continue there’s an important issue surrounding privacy laws that need to be addressed. During May of 2018, the General Data Protection Regulation (GDPR) was rolled out.
It’s a European regulation that specified regulations surrounding data collection, storage, and use online. Since you’re running a website that’s accessible to the entire world, then you probably fall under GDPR legislation. Some website owners think of GDPR as a hassle, but instead, it should be seen as a way to improve the privacy and security of your user’s information, which is important. Those who care about their users and their privacy will succeed in the long-term.
With a contact form you’re collecting user information, so you’ll need to think about compliance.
Failure to comply with any of the regulations set forth with GDPR could lead to massive fines and a serious loss of user trust.
The following information shouldn’t be taken as legal advice. Instead, it’s compiled based upon privacy best practices. If you’re concerned about GDPR compliance you should consult a lawyer for actual legal advice.
Here’s how to improve your chances of compliance in accordance with the latest GDPR regulations:
1. Only Collect Required Information
The beauty of using a WordPress contact form is you can customize the user information that you’re going to collect. By collecting only the user information that’s necessary you’ll make it easier to keep track of user data. Data storage and protection is very important under GDPR. By knowing the exact data and user information you’re collecting it’ll be that much easier to remain compliant.
2. Enable User Consent
With GDPR your users need to consent and be aware of any data and information they’re giving you. For this reason, you’ll want to offer visitors a way to give their consent. With most contact form plugins you can give user’s a check-box that notifies them about data collection. This will also tie into your privacy policy which will spell out in detail the data you’re collecting and how you’ll be using it.
3. Disable Tracking (Or Add Acceptance)
If you’re currently employing any tracking, then you need to either turn off any tracking that’s happening without your user’s content or utilize a plugin that allows your users to accept the use of cookies or any other form of trackers. Most contact form plugins won’t utilize any tracking, but you’ll want to double check this before you decide on a contact form plugin.
4. Improve Security and Data Storage
Part of GDPR compliance involves implementing proper security protocols during the collection and storage of any user information or data. First, this means you should be securing your website with proper WordPress security plugins and protocols, along with making sure you’re using a secure hosting provider.
It’s also helpful to install an SSL certificate on your site. This will enable an HTTPS connection which encrypts any information that’s transferred between your user’s web browser and your server. Plus, this has the added benefit of improving user trust and avoiding any security issues with the Google Chrome browser.
5. Add a Privacy Policy to Your Site
Every website needs an active and updated privacy policy. This privacy policy will spell out in detail the information you’re collecting and how you’re going to utilize that information. Under GDPR you’ll also need to give users the ability to ask for and receive any personal information you’ve collected, along with put in a request to delete that information.
GDPR is a fairly complex topic. The tips above should help with contact form compliance, along with elevating your overall levels of compliance. If you’re interested in further learning about GDPR and ensuring compliance with your WordPress site, Kinsta has done a great write up on the topic.
How to Add a Contact Form to Your WordPress Site
Finally, it’s time to add a contact form to your WordPress site!
By now you’ll have found the perfect contact form plugin, and understand the issues surrounding privacy and data collection.
Note, for the sake of the tutorial below we’ll be using the Ninja Forms plugin.
1. Install the Plugin
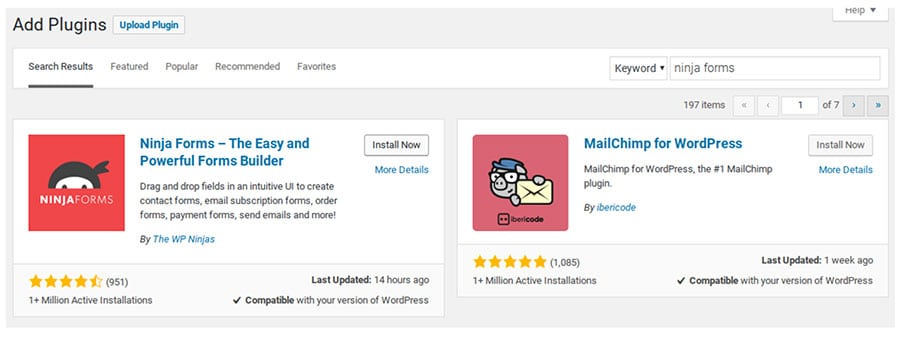
First, you’ll need to install the plugin on your site. To do this navigate to the backend of your WordPress site. Once you’re there navigate to Plugins>Add New, and search for “Ninja Forms”. Then, install and activate the plugin that looks like the one below.
2. Create a Form
Once you’ve installed the plugin you should be automatically taken to the form creation screen. If not, then click on “Ninja Forms” on the left-hand menu. Once the plugin opens you should see a screen that looks like the one below.
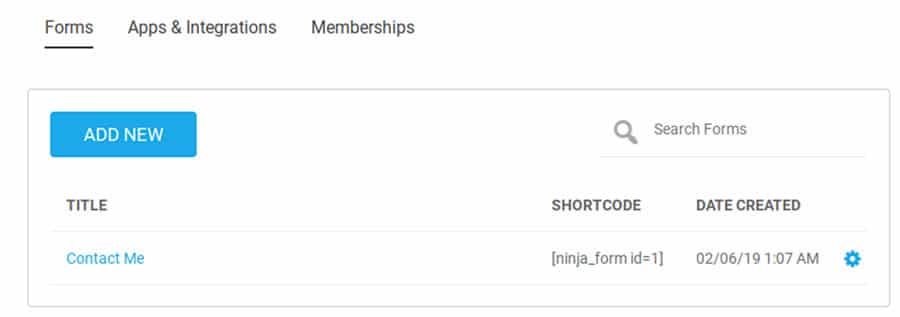
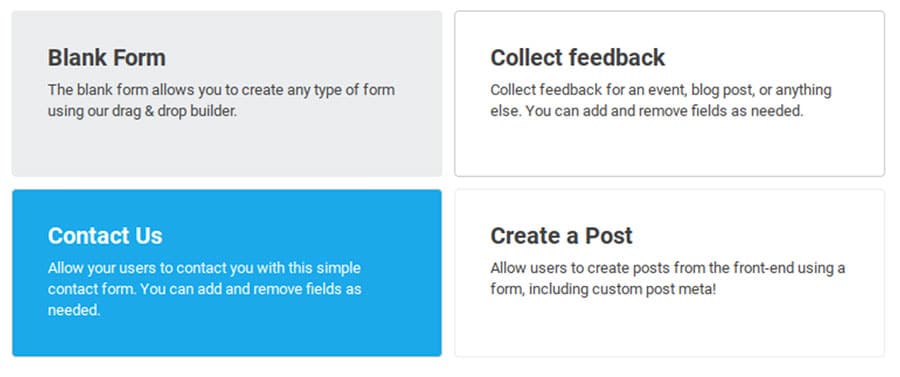
Click the blue ‘Add New’ button and you’ll see a pop-up that’ll allow you to select the type of form you want to create. Since we’re creating a contact form go ahead and click the box labelled ‘Contact Us’.
3. Customize Your Form
By choosing the contact form template above you’ll now have a basic foundation to work from. You’ll see that the plugin already creates the fields required for a basic contact form.
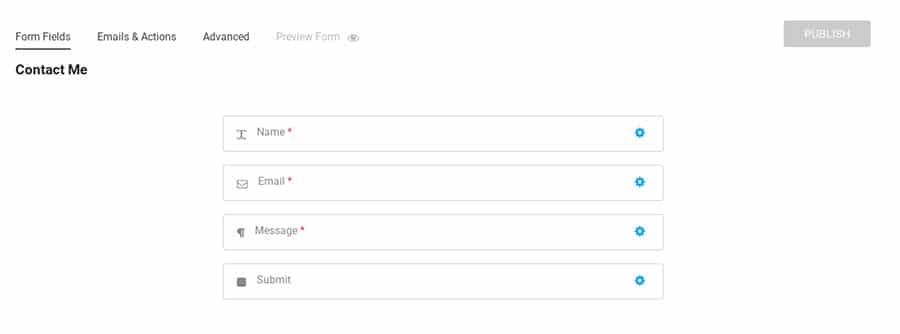
If all you need is a fairly basic form, then you can go ahead and click the ‘Publish’ button in the upper right-hand corner.
But before we finish this form, we’re going to add a drop down list of options. To do this click the big plus icon in the bottom-right corner of the screen. This will bring up a big list of form fields that you can add and customize to your liking.
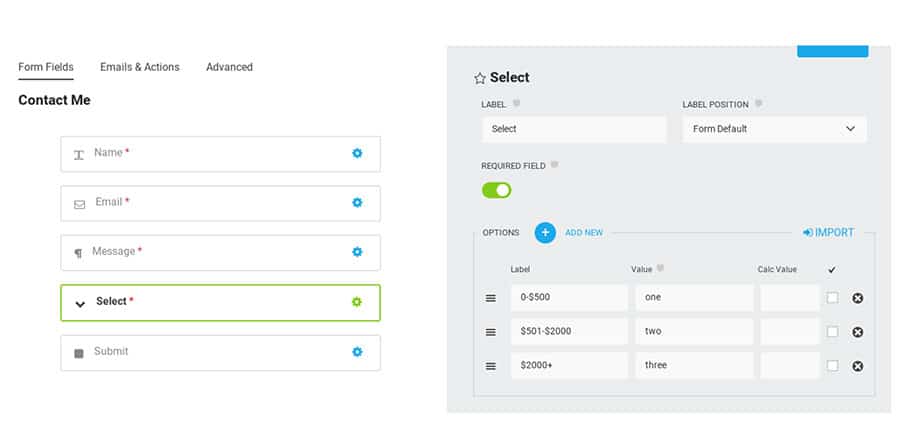
We chose the “Select” option which gives you a drop-down box filled with options your user can choose. You can use this for different price points for your services. Or, use it as a filter for the type of message your user is sending.
Note that you can rearrange the location of any of your form fields by dragging and dropping on the right-hand side. Once you’re satisfied with your form click “Preview changes” and you’ll be able to see what your form actually looks like.
4. Configure Compliance and Security Options
Now that your form is complete we’re going to do a few more things to make sure that your contact form is compliant and you’re protected from any spam.
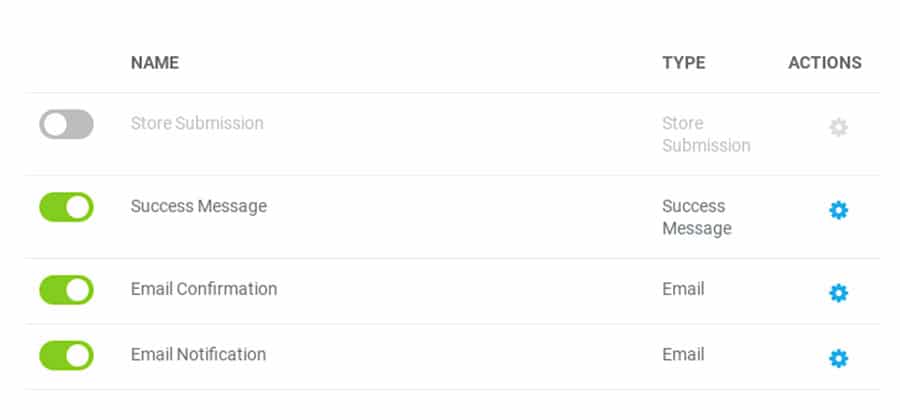
To do this we’re going to disable the option that stores form data. Chances are you won’t need this anyways.
To do this open up your form and select ‘Emails & Actions’, then turn off the option that says ‘Store Submission’.
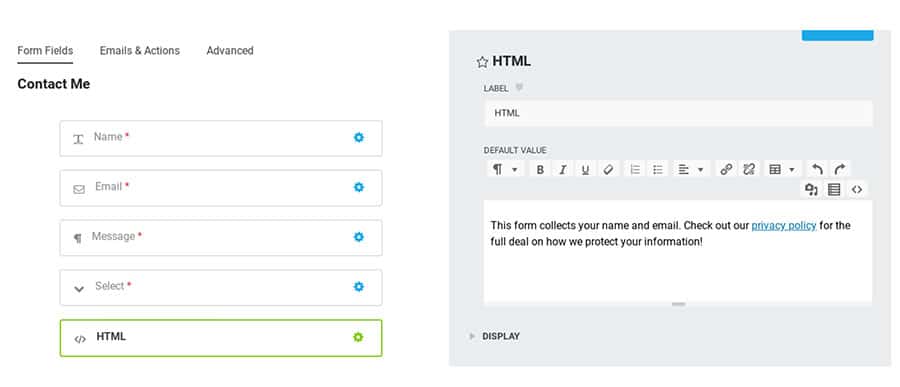
Next, we’re going to add a user consent option to your contact form. To do this head back over to ‘Form Fields’ and select the HTML option. Here we’re going to add a bit of text and link out to your privacy policy.
Finally, we’re going to add a checkbox by clicking the ‘Single Checkbox’ option, which will allow your users to give their consent.

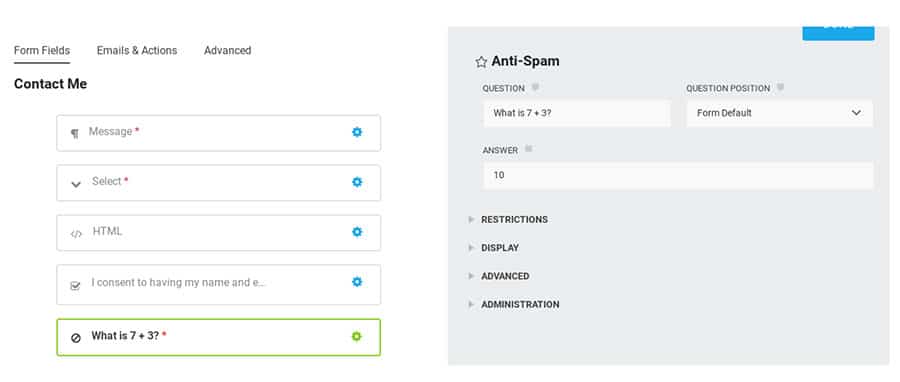
It’s not a requirement, but if you’d like to improve the anti-spam measures of your contact form, then you can add an anti-spam question. This will help to keep bots out of your inbox. To do this scroll down until you see the ‘Anti-Spam’ option and add it to your form.
Here you can enter a question and answer to improve spam protection.
5. Embed the Form in Your Site
Now our contact form is looking good, is compliant, and will help to keep the bots at bay. Now it’s time to add it to your site.
You’re going to have two options for doing so.
The first is embedding the form into any page on your site (probably your contact page). To do this first copy and past the shortcode of your contact form.
You’ll find this on the Ninja Forms plugin dashboard where all of the form shortcodes are listed. Once you’ve found this copy the shortcode that corresponds to your form.
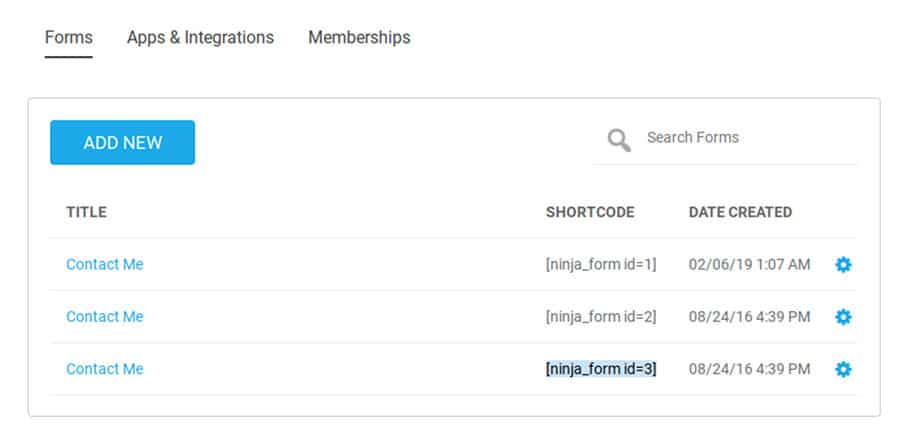
Then, navigate to your contact page and paste the shortcode into the page.

Just click ‘Publish’ and you’ll have a live contact form on your site!
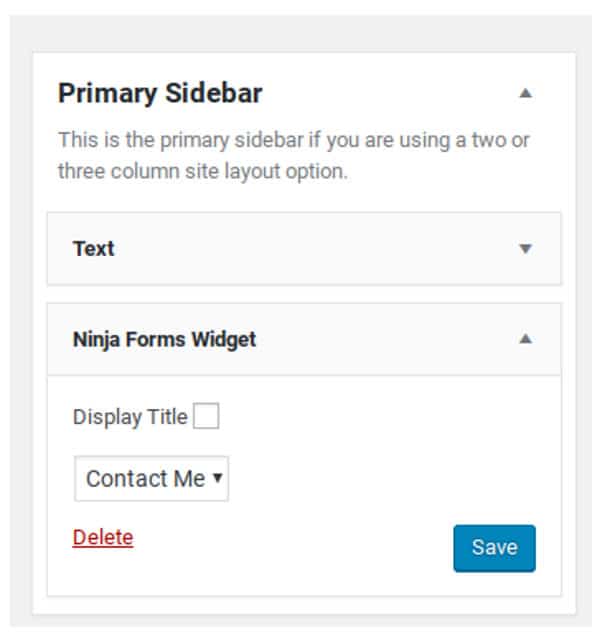
The second approach is to utilize a widget. This can be useful if you’d like to add your contact form to your sidebar.
To do this navigate to Appearance>Widgets and locate the widget called ‘Ninja Forms Widget’. Then drag and drop the widget into the desired location, select the form type and click ‘Save’.
In Closing
Knowing how to add a form to your WordPress site is a very important skill. By utilizing a contact form plugin you’ll help to stop spammers in their tracks, make your site look more professional, and make it easier to collect the right information from your users.
We went with the Ninja Forms plugin, since it’s one of the most beginner friendly contact form plugins out there. However, you’re free to use whichever contact form plugin you desire. Following the tutorial above you’ve learned how to install the plugin, customize your form, add new fields, make sure your form is compliant, protect yourself from spammers, and add your contact form to your site.
By now you have the ability to create a beautiful and functional contact form, and add to to your site however you wish.
Jamie Spencer
Latest posts by Jamie Spencer (see all)
- How to Start a Successful Cryptocurrency Website - September 12, 2024
- 50+ Ways To Advertise Your Business For Free On The Internet – 2024 Guide - September 5, 2024
- The Fastest WordPress Hosting Providers 2024 – If You’re Not Fast…You’re Last!!! - July 8, 2024
