Bluehost is one of the most popular hosting companies for WordPress blogs and websites. With affordably priced tiers and a simple-to-use interface, it’s no surprise that Bluehost hosts more than two million websites from its headquarters in Provo, Utah. One of the most popular features that Bluehost offers customers is issuing a free SSL certificate.
The acronym SSL stands for secure sockets layer, a common encryption protocol used on websites. You’ll know when a website is using SSL because the URL (address) will start with HTTPS instead of HTTP (some browsers also display a “lock” sign in the address bar as well). Common use cases for SSL encryption include e-commerce sites, login pages, and financial websites where protecting the user’s privacy is paramount. However, it’s easy to get confused about the difference between SSL and an SSL certificate.
In short, SSL is the protocol or rules by which information is transmitted in an encryption form. But the actual encryption depends on which SSL certificate you use. SSL certificates also provide one additional important benefit – the ability to authenticate your website. When a visitor comes to your SSL-encrypted website, their browser will “examine” the certificate to make sure that it matches the domain (URL/address). This gives your visitors additional confidence that they’re truly visiting your website and not a fake one designed to look like your website.
SSL is so important that most payment providers will refuse service unless you adhere to the PCI (payment card industry) standards which include the proper use of an SSL certificate. And because all the information that users are entering on your website is encrypted, all parties can be assured that their information isn’t being stolen by hackers. SSL certificate providers are required to perform certain checks before they can issue the certificate including verifying identity and adherence to industry privacy standards. Google and other search engines rank secure websites over similar but unsecured websites.
Therefore, the SSL certificate performs several functions:
- It protects user information and data.
- It authenticates your website as legitimate.
- It encrypts the data being sent back and forth on your website.
- Improves SEO.
Each SSL certificate contains two components: a public key and a private key. The public key is available to anyone who visits the website while the private key is exclusive to the website’s server. When a visitor first visits your website, your site will send the visitor’s browser a copy of its SSL certificate, which includes the public key. The user’s browser will then investigate the certificate for legitimacy, including who issued it (and whether or not they can be trusted), and whether or not it has expired or been revoked.
Assuming all is in order, the visitor’s browser will then begin loading the page. Your hosting server will then issue a session key (based on its own private key) that will expire as soon as the user leaves your page. Throughout the rest of the interaction, all of the encryption will be handled by the session key.
There are actually three different kinds of SSL certificates, categorized the type and sensitivity level of the information that needs to be protected. A standard SSL certificate is good for things like blogs or websites that don’t deal in a lot of sensitive information. But an EV (extended validation) SSL certificate is needed for high-volume shopping and payment sites where visitors need reassuring that the website’s identity has been checked and validated more thoroughly. Lastly, an OV (organization validation) certificate is designed to cover a company or organization’s entire domain that may include hundreds or even thousands of different websites.
Because Bluehost is both providing the hosting and issuing the SSL certificate, the ability to add enhanced security to a WordPress website is simple and easy. But before you rush to obtain an SSL certificate and convert your website to an encrypted one, keep in mind that doing so is not right for everyone. Encrypted websites use more server resources. And because there is more information to process, your website might load a bit more slowly. Lastly, “locking” up your website with SSL and HTTPS may not be the right choice if you’re not processing sensitive data and/or want a more open, public, and welcoming image.
How to Install and Use a Bluehost SSL Certificate
First, of course, you’ll need to be an existing Bluehost customer in order to install an SSL certificate on a website that they host. All tier levels or subscription plans with Bluehost include a free SSL certificate.
Note: If you’re a brand-new customer who hasn’t installed a WordPress site on Bluehost yet, you can turn on HTTPS before you install WordPress. This will make it a lot easier to use an SSL certificate later on.
Secondly, before you begin, you’ll need to make sure that you’ve disabled any “WHOIS” protectors for your website. This may be known as “whoisguard” or just “domain privacy.” By law, the owner and operator of a website must register that information in the WHOIS database. But there are a number of companies (including Bluehost) which allow you to hide this information from the public.
If you’ve activated a WHOIS protection service, you’ll need to temporarily disable it so that Bluehost can verify that you are, indeed, the owner of the website. Once the SSL certificate has been activated and everything is working, you can safely re-activate your domain’s WHOIS privacy protection service again.
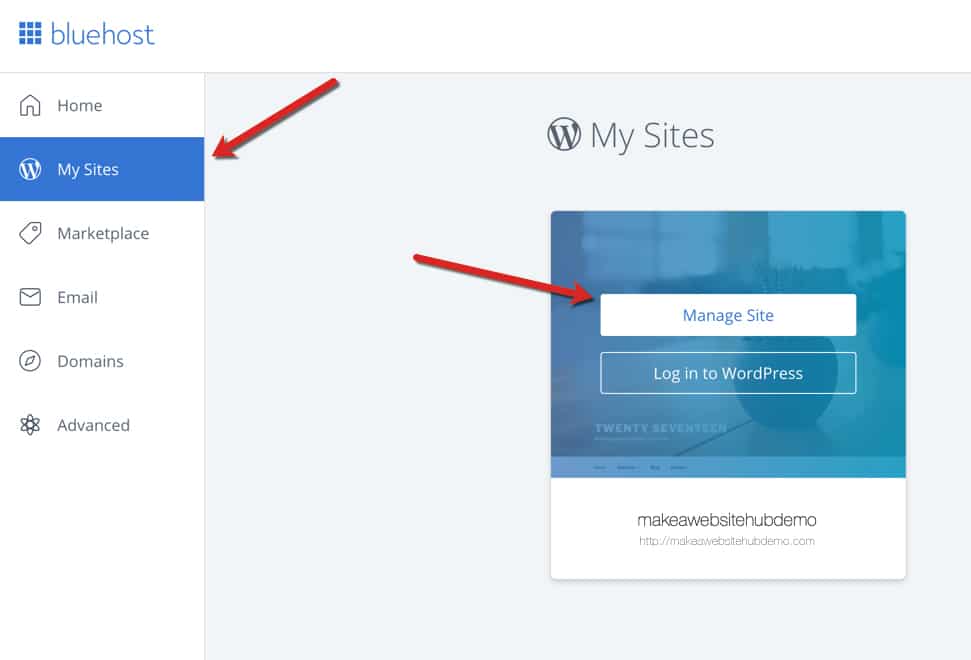
Once all this is done, log into your Bluehost control panel (cPanel), and click on My Sites in the left-hand column. Then click on “Manage Site” in the middle of the screen. If you are hosting multiple websites on Bluehost, you’ll need to choose which one you want to “Manage Site” (and add the SSL certificate) for.
Next, click on “Security.” You’ll see a toggle (on/off) switch next to a line that says “Free SSL Certificate.” Make sure it’s switched to “on” and green in color.
Note: It usually takes a few hours for Bluehost to prepare your SSL certificate. If you see a notice that says “Working on it…”, you’ll be advised that Bluehost will send you an email when the SSL certificate is ready. If you see this message, you’ll just have to wait until it’s ready.

You will get two emails from Bluehost. The first will thank you for your “purchase” of a free SSL certificate, and the second email will tell you when the SSL certificate for your website is ready.
In other cases, the way to find and activate the SSL certificate is by going to the “Addons” tab from your Bluehost control panel (cPanel). Then click on “learn more” next to “SSL Certificates,” and then click on “WordPress Free SSL.” Click “install.”
Once your SSL certificate has been installed, you can convert your website from HTTP to HTTPS. However, if you want to check and see what the SSL certificate says (and verify that it’s working), you can use a free online tool. The tool will also identify any problems with the SSL certificate as well as showing you when it expires and the identity of the SSL certificate issuer.
Here’s a screenshot of the type of information revealed by the SSL checker tool:

Assuming everything looks okay, you can now re-activate your WHOIS domain privacy service, if you are using one.
Migrating WordPress from HTTP to HTTPS
Now that the SSL certificate has been issued and is working correctly, it’s time to migrate your website from HTTP to HTTPS. With a Bluehost SSL certificate, your website will be available in both HTTP (unsecured) format and HTTPS (encrypted) format.
What you need to do is tell all incoming links to your old HTTP addresses to automatically convert to HTTPS. And there are several ways to do this. The easiest is to use a plugin called really simple SSL that is available for free.

Once you’ve downloaded and activated the plugin, you’ll see a message like this:

Before you click on “Go ahead, activate SSL!”, make sure that you’ve made a back-up of your website. Most of the time, you shouldn’t lose any data or experience any problems, but it’s always a good idea to make a full backup before making major changes like using HTTPS.
The next step is to tell your WordPress server how to automatically convert HTTP URLs to HTTPS so that visitors coming in from old HTTP links will be redirected to an HTTPS version of the link. This is done by editing the .htaccess file.
To do this, you can either edit it manually, or you can use a plugin like Yoast SEO. Regardless of which method you choose, you’ll need to add the following lines to your .htaccess file (whether you add them to the beginning of the file or the end of the file is irrelevant):
RewriteEngine On
RewriteCond %{HTTPS} off
RewriteRule (.*) https://%{HTTP_HOST}%{REQUEST_URI} [R=301,L]
Almost done!
To ensure a completely smooth transition, it’s a good idea to update all the existing links on your website to different sections/posts/pages to the new HTTPS format. And the easiest way to do that is with another plugin, this one called Better Search and Replace.
Once you’ve installed and activated this plugin, click on “Tools” in the left-hand column of your WordPress admin screen and then “Search and Replace.” Simply replace any HTTP URLs that connect to your website (i.e. http://www.mywebsite.com to https://www.mywebsite.com) and click “Run Search/Replace.”
Wrapping Up
Now that your free SSL certificate has been activated, and your website is operating exclusively via HTTPS, there are a few other recommended steps to take.
- Update URLs for your website on social media.
- Update URLs for your website on other online profiles/accounts.
- Update to the new URL on Google Analytics.
- Update the new URL information with any advertisers and/or providers of third-party content (i.e. ads, banners, etc).
- Re-enable any WHOIS protection, if you haven’t already done so.
It’s also a good idea to enable “Always redirect to SSL” in your Bluehost control panel (cPanel). On the left-hand side, click on “Tweak Settings,” and then choose the “Redirections” tab. Make sure both that “Always redirect to SSL” is set to “Enabled” and that “SSL redirect destination” is set to “Default.”
If you want to view and/or download your SSL certificate, you can do so by clicking on the “Addons” tab from your Bluehost control panel. Then click on “learn more” adjacent to “SSL Certificates.” You’ll be given the option to either “View your SSL certificate” or “Download your SSL certificate as a .zip file.”
Notes
The free SSL certificate offered by Bluehost is actually provided by a company called Let’s Encrypt which offers free SSL certificates for everyone. Therefore, you can choose to get your SSL certificate directly from Let’s Encrypt or from another provider, if you so choose. If you do this, however, you’ll still need to access your Bluehost control panel (cPanel) and install the SSL certificate.
Note: You can also obtain something called a shared SSL certificate which covers multiple websites (domains). With a shared SSL certificate, you can install and use the same certificate for all of your websites, even those without a dedicated IP address.
Keep in mind that SSL certificates are tied to a specific domain (URL/address). Therefore, if you change domains, you’ll need to get a brand-new SSL certificate.
Conclusion
For a newbie blogger who is just starting a blog, you just need to enable HTTPS on your site as soon as you purchase hosting from Bluehost.
You can get hosting from Bluehost here. (You also get Free SSL + PHP 7 + Free Domain and email) for as little as $2.95 p/m
Bluehost is one of the world’s most popular affordable hosting services for WordPress websites. And while Bluehost doesn’t issue SSL certificates, it does give users the ability to acquire one for free (from Let’s Encrypt) and install it with a few simple clicks via the Bluehost control panel.
Once that has been done, it only takes a couple of minutes to update your WordPress website’s internal links to HTTPS (instead of HTTP) and ensure that old inbound links are automatically converted to the new HTTPS format.
If you’re operating a WordPress website that is involved with e-commerce, banking, or handles sensitive information, securing your site with HTTPS and an SSL certificate is a must. By following this simple guide, you can easily migrate your website to a fully secured format without losing any data or SEO ranking.
Jamie Spencer
Latest posts by Jamie Spencer (see all)
- How To Make Money As A Kid In 2025 – 6 to 16 Years Old - December 9, 2025
- 17 Of The Best Google Adsense Alternatives 2025 - October 13, 2025
- How to Start a Successful Cryptocurrency Website - September 12, 2024