
Sometimes the content you have shared with the world becomes irrelevant, outdated, or no longer fits your personal interests as a writer. Getting rid of this content, especially when hosted by another entity, can be tough to do. Your best bet is to gather some good SEO intel so you can push that information and pages far down into the search canal system. With WordPress, removal of content does not have to be a timely or difficult process.
WordPress hosts two different website building domains, WordPress.com and WordPress.org. The .com entity helps you build a website with WordPress themes, color schemes, and other such information made readily available to you on this platform. This blog platform is completely web-based, requiring no additional software downloads. The .org entity is where you will you find the software hosting mechanisms.
This entity features a free software download and it will allow the user to use other WordPress friendly hosting services. One is done on the web base, while the other comes in download format with additional hosting options. Both of these services are free and both demand a different course of action in order to delete. Below we’ll give you a step-by-step process that you can use to remove your WordPress blog and content. We’ll also detail how this information is removed from achieving and other such spaces on the web.
WordPress.com Deleting
The first entity we will start with is the WordPress.com format. This format is the option that lets you build your website directly through the web-based space. All of the content you need is hosted by this web entity, and deleting this information is rather simple. Below we will host a step-by-step process for you to follow to remove this content.
Step 1:
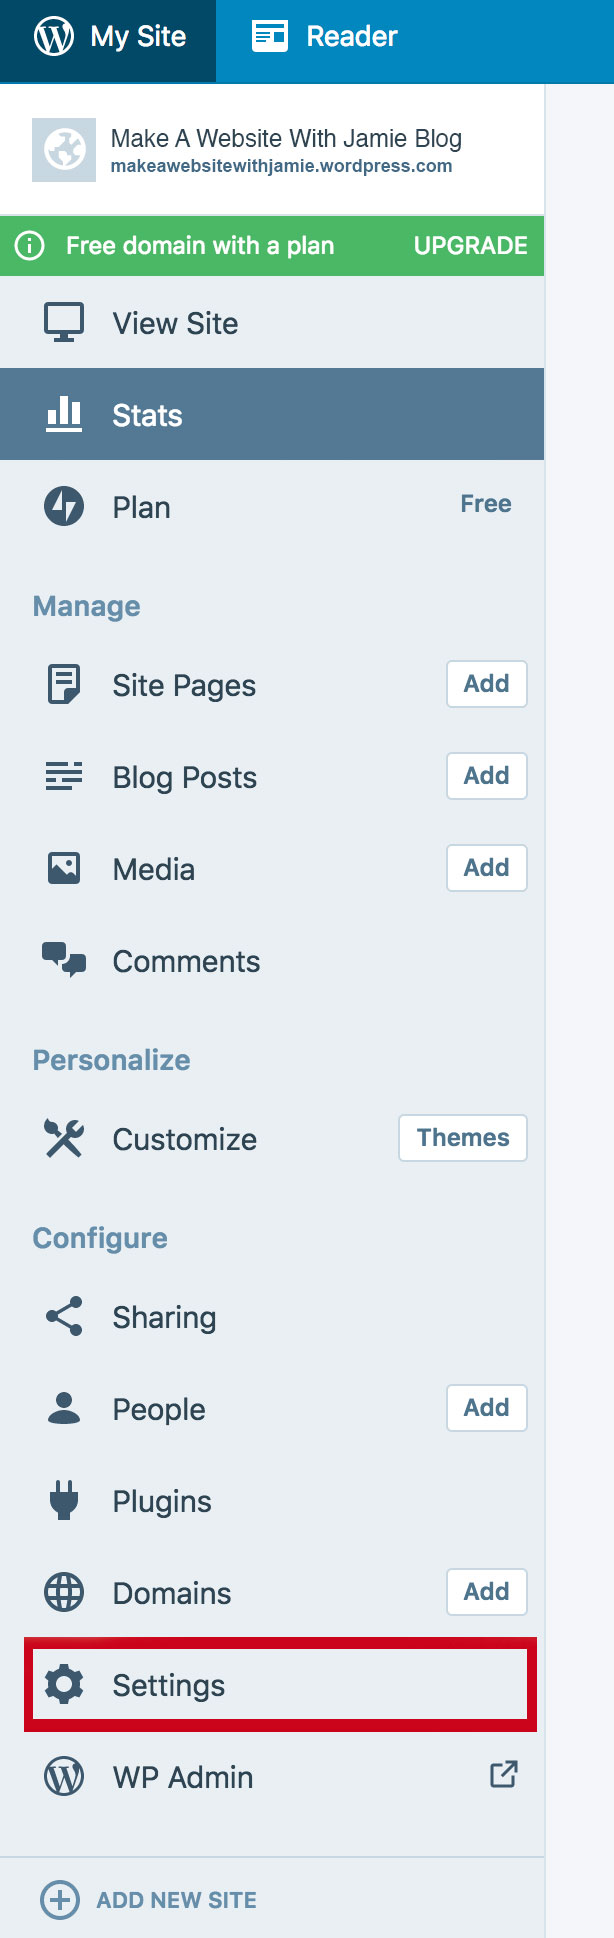
Start by visiting your WordPress blog and log in to your account. This will give you access to your account dashboard, which is the location you will utilize to delete your content. Under the dashboard drop-down menu, you will see an area labeled “Configure”. Within this area is a tab labeled “Settings”. Click this tab.
Step 2:
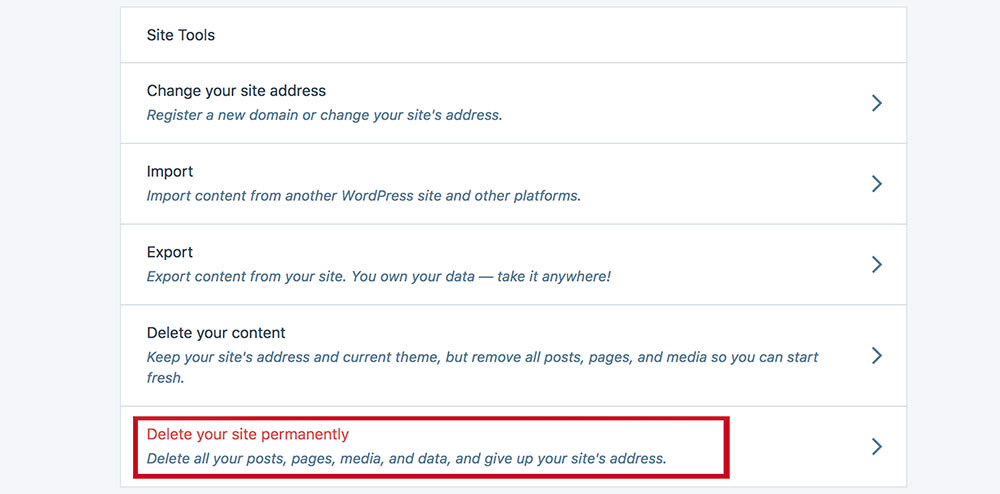
Once you have accessed the settings area, you will see a button that hosts the phrase “Delete Site” near the bottom of the page. Simply click this button and all of the information you have created and developed will be permanently removed from the WordPress.com space. Ensure that you save any additional information or write-ups you want to keep before clicking this button. Once confirmed, this information no longer exists and can no longer be accessed. It is good practice to back-up any important files and information via a USB drive or other such storage system.
WordPress.org Deleting
The second format of this web-hosting servicing is the use of the .org entity. This process involved the download of additional WordPress software, so it is important to note that deleting this information is done in a different fashion. Below we’ll detail the step-by-step fashion of deleting this software and other such related content to the .org entity.
Step 1:
Log into your cPanel dashboard. This service is provided by WordPress to auto-install information onto your computer or device of choice. Therefore, once you completed this download or installation process, you obtained access to the cPanel dashboard. If you are unfamiliar with this source, try accessing it with a URL similar to: http://cpanel.mywebhosting.com/. Since this servicing option contains many different hosting options, this URL may differ across the user base. Once you have accessed your cPanel dashboard, click on the “Hosting” tab.
Step 2:
Once you have clicked the “Hosting” option, you will find a display that showcases your active domain name and URL, the plan you are under, the status of your account, and an “Actions” heading. Below this heading is a button that says “Switch”. Click this button.
Step 3:
Once the switch button has been accessed, it will take the user to another cPanel control area. This area showcases the different blogs you have featured, produced, or are actively in-process. In this section, you will be able to locate the WordPress blog icon. Click this icon and select the “Uninstall” option. This will remove all of the WordPress content from the multiple hosting services and will permanently remove the software from your device. During this removal process, any associated content to your WordPress blog is also deleted, so ensure you save anything you wish to keep prior to completing this step.
Manuel Removal of WordPress Content
Sometimes the user opts to use the manual installation process. This selection is fine, but it also requires that the user manually remove this software. Thankfully, this choice comes will a couple of different outcomes one can utilize to ensure that their information is permanently removed from this self-hosting service.
The console command function is the first option you have. This process involves a coded input of different characters that will signal the deletion of your content or blog. This coding information is made available on the internet in prevalence, so ensure you are using the correct coding list and format before inputting this content into the command feature. This step is also known as the SSH access format. This is simply the interface that your computer uses to produce coding options for any such space you wish. Finding the correct SSH access code is essential to ensuring that your content removal goes smoothly and is fully carried out.
The second option the user has is the use of their FTP client. FTP stands for file transfer protocol. This is essentially the name of your file hosting, transfer, and sharing entity. These service providers allow users to share information from computer to computer and it is the essential location where a user can find a bulk of saved information. This service also hosts a dashboard that is easily accessed by the user. Within this dashboard, the user will find many different hosted directories installed or currently in-use on your computer or device. Locate the icon for the WordPress directory.
Right-click on this icon and scroll to find the “Delete” option. This will manually remove all functions that WordPress have hosted on your computer or device up to the present point, with includes you blog and other such information databases.
The last step is through the use of a web-based manager. These offerings usually carry your information and websites in a secure manner. They can also be essential providers to quick removal of content and services, if need be. Log in to this web-based servicing and locate your account’s dashboard. These sites also host a file manager interface, which you will need to locate upon accessing your dashboard. This will display the current icons in-use. Locate the WordPress icon and find the “Delete” button.
Site Database Removal
Sometimes, you will miss certain components of information and database materials when you delete your WordPress blog. Thankfully, there are two separate options the user can use to ensure that this information is permanently removed from WordPress’s archives and other such web-hosting platforms.
The first removal process comes through the use of the PHPMyAdmin. Now, I know you are thinking that this terminology will start to go over your head. The PHPmyAdmin tool is something that is free for the user to access and is used primarily in MySQL formatting (the formatting that WordPress takes on). The PHP acronym placed before the MyAdmin functioning, is simply a language that has been specially designed to use in the web development space. In turn, this makes the language synonymous with the removal of such language and content.
The administration feature allows you to access your web hosting services via a direct panel. This panel will display an icon or terminology for WordPress. Simply locate this tab and click on the “Remove Database” option. This will completely clear the database working your computer has used in association with WordPress and its separate entities.
The command feature becomes useful in the database removal process. Once again, the coding structure and inclusions will differ across users, due to the different account log in information that people will host. The formatting for this command holds relatively true across most devices, but it might not be compatible with all devices, making it an essential target for testing before carrying out the process. Simply place the command within the MySQL area and it will remove the database information from your WordPress blog.
Summary
The steps that have been provided will assist you in the different formats of removal of content. Each of these options suits the user’s needs for the .org and .com entities, making the removal process a breeze for any individual. One important thing to consider before deleting any of these items is to back-up your information. When going through the deletion process, there is no turning back once you have accessed the correct commands or have pressed certain buttons.
Backing up your information via different cloud-based formats, hard drive options, or other such internal/external sources is good practice for any user to utilize. Ensure you do whatever you can to save the information you need before you begin any of these steps. The rest will be a breeze. If you find yourself stuck or in a rut, a simple web search can place you back on the right track.
Some of the terminology involved in the removal of content process can be thick and require some additional knowledge. Web-based infrastructures can help define these terms and ensure you that you are using them in correct fashion. So, do not be shy to do a little extra digging before carrying out some of these commands. It will be extremely beneficial to present and future knowledge.
Jamie Spencer
Latest posts by Jamie Spencer (see all)
- How To Make Money As A Kid In 2025 – 6 to 16 Years Old - December 9, 2025
- 17 Of The Best Google Adsense Alternatives 2025 - October 13, 2025
- How to Start a Successful Cryptocurrency Website - September 12, 2024