WordPress is one of the most popular website building & blogging platforms in the world. Millions of websites have been built using WordPress, ranging from e-commerce stores, government websites and online news outlets to corporate websites, personal profiles and more.
WordPress is popular for a variety of reasons. Website builders prefer it because it provides a basic framework with hundreds of quality themes that can be easily manipulated. Internet marketing experts recommend WordPress because the platform is relatively SEO-friendly while offering a variety of plugins that can help improve functionality.
Regardless of your need for using this platform, one issue that many people must face when they begin to build a website is how to install WordPress. The method you choose will depend on your particular hosting provider and personal preference.
How to Install WordPress using SimpleScripts
SimpleScripts is an installation tool that web hosting companies use when they offer WordPress hosting. The tool allows website designers to install WordPress with just one click of a button. If you follow my how to start a blog tutorial you will notice that Hostgator call this Mojo Marketplace.
You will see the SimpleScripts icon next to the WordPress icon on your host’s admin panel if they offer this feature to customers. Once you click on the icon, you will be taken to a screen that lists a variety of other scripts that can be installed using this tool, including shopping cart software and other blog platforms. Click on the WordPress icon located on this screen.
Once you click on the icon, you’ll be taken to the installation page. From there, you can manage all of your WordPress installations, if necessary. Click on the “install” button located on the bottom left hand part of this page.

You’ll then be taken to a page where you can choose your installation preferences, such as whether or not to install WordPress for your main website or as part of a sub-directory and the name of your blog.

Once you’ve completed this form and chosen your login credentials, hit “complete” to begin the installation process. If the installation was successful, you’ll then be shown an “installation successful” screen letting you know everything is finished. You can then login to WordPress using the information given to you during the installation process.
How to Install WordPress using Fantastico
Fantastico is a script installation tool that many popular web hosting companies offer as a WordPress installation tool.
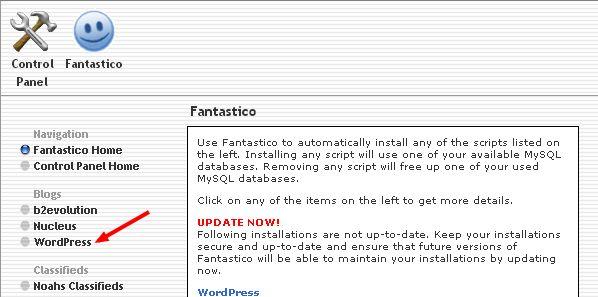
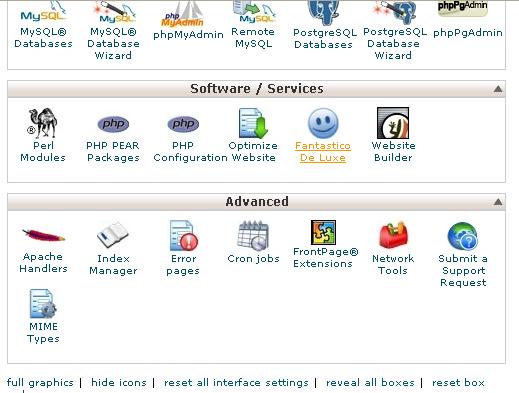
Like other tools, if Fantastico is offered by your hosting company, it can be found listed on your admin panel (cPanel). Click on the icon to be directed to the Fantastico control panel.
The Fantastico control panel will feature a variety of different installation options, most of them relating to content management and blogging. Choose the option that says “WordPress” and then click on the “New Installation” link once you’re presented with WordPress installation options.
Next, you need to choose which domain to use for your WordPress installation. If you want it on your main domain, leave this section blank. Choose a login username and password, and enter a valid email address where specified. You will also be prompted to enter a brief title and website description, both of which can be changed later.
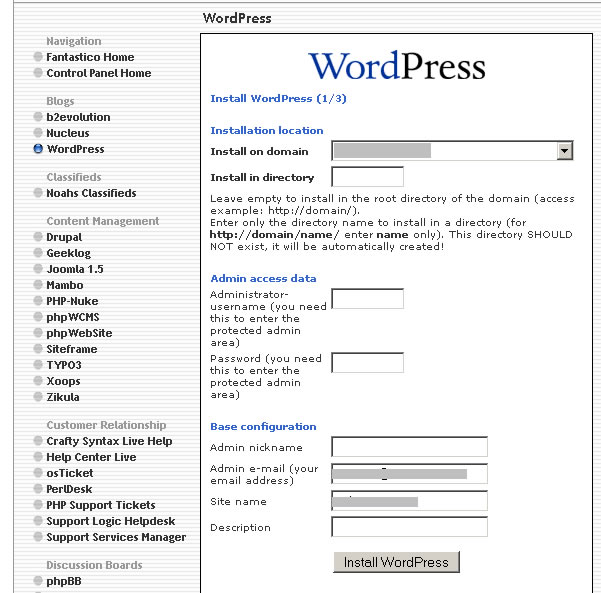
Finally, click on the “Finish Installation” button located on the bottom of the page. You’ll need to confirm all of your information before the installation is completed.
How to Install WordPress using Softaculous
Softaculous is a simple and easy-to-use WordPress installation tool. Like SimpleScripts, it allows website owners and bloggers to install WordPress with one click of a button. If your hosting company uses it, you can find it on your admin panel.
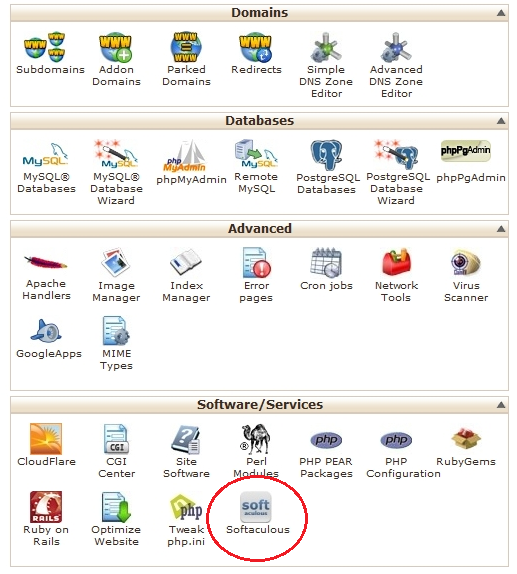
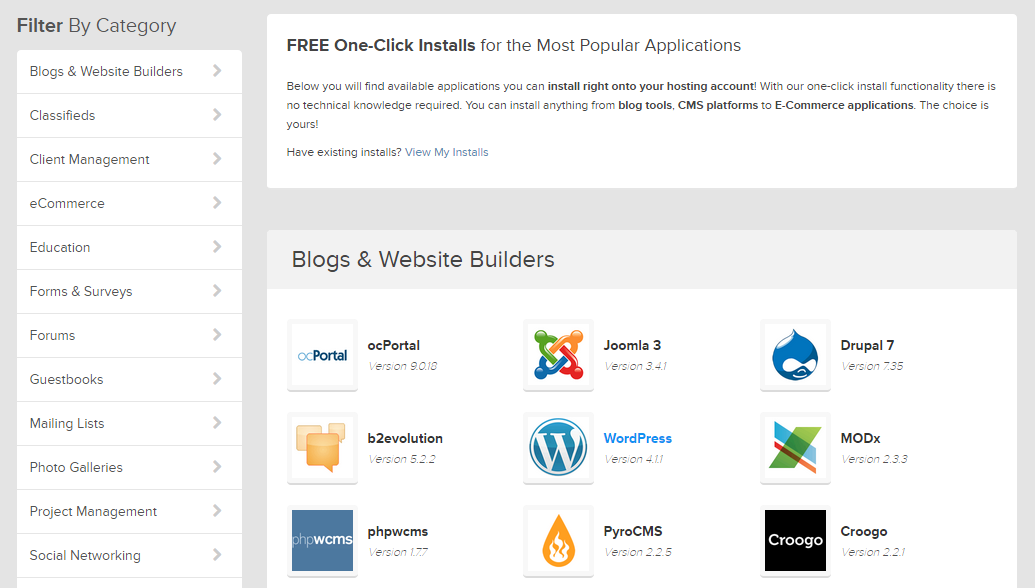
After clicking on the Softaculous icon, you’ll be taken to the tool’s installation dashboard. On the left hand side of the page, you’ll notice a list of different categories to choose from. Click on the “blogs” category and then choose “WordPress”. Once you click on “WordPress”, find and click the blue “install” button on the bottom of the page.
The next page will require some basic information about your installation preferences. Fill in the “In Directory” field with the domain that you want WordPress installed on. If you want it installed on your main domain, leave this field blank. Next, pick a name for your WordPress database by filling in the appropriate field. You can also modify the security and change the prefix of the database if necessary.
Then enter a basic description for your website in the relevant box. Leave the WPMU box alone unless you have extensive experience with WordPress installations. Choose your login details and enter a valid email address into the “email” field.
Once you’ve completed this form, click on the “install” button and you should be ready to go in a matter of minutes. You can login to your WordPress account by going to yourdomain.com/admin and logging in with your details.
How to Install WordPress using FTP
While using FTP is not as common anymore for individuals who build websites using WordPress, it is still important to learn how to upload files using this process.
First, download an FTP program of your choice. There are many free ones available that are safe and easy to use. Once you have FTP installed onto your computer, download the latest version of WordPress. Click on the WordPress file to unzip it and leave it on your desktop for easy access.
Next, use your chosen FTP software to upload the files into your web host. You’ll need some basic login information from your host when uploading via FTP software, and you’ll be prompted for this information once you enter in the file upload location.
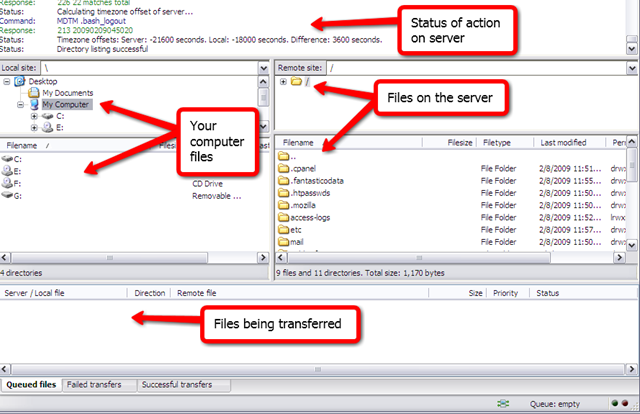
You’ll normally have two options for upload location: Your main domain or a sub folder. To upload WordPress to your main domain, choose the /public_html/ folder. If you want it installed into a sub folder, choose /public_html/foldername/. Once you’ve completed the upload process via FTP, you can log in to your cpanel to create a database.
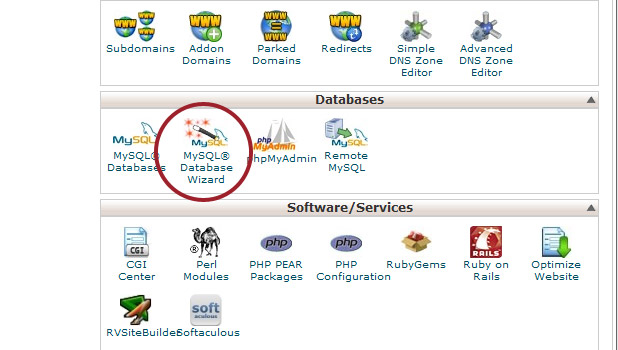
Click on the “MySQL Databases” to begin. Choose a name for your new database when prompted(the name should be closely related to WordPress) and click “create database”. Once the database has been created, you can now run the installation process of WordPress for your website.
To begin the final stages of installation, go to www.yourdomain.com or whichever URL you choose when uploading via the FTP software. You will then be prompted with an error message that informs you to create a wp-config.php file. Once you’ve clicked on the “Create a Configuration File” button, you’ll be taken to a page that features a number of different database-related text fields. Skip over these fields and click on the button that says “Let’s Go” on the bottom of the page.
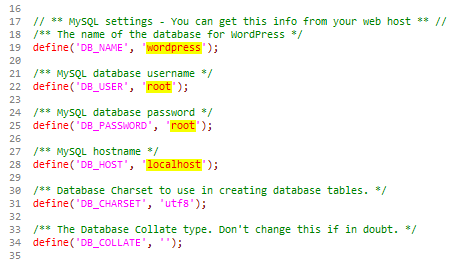
On this page you will choose your basic login information and database name, database host and table prefix. If you are unsure about what to enter in these fields, contact your hosting company’s tech support for help. Once all the fields have been filled in, click on the “Submit” button. You’ll be taken to the final prompt screen where you can finally click on the “Run the Install” button to complete the process. Next, simply enter your login information and click “Install WordPress”. The installation process will only take a few minutes and then you can begin building your website or writing for your blog.
Those who are brand new to the art of designing and developing WordPress websites should avoid using the FTP process in the beginning and instead stick with one-click installation tools provided by your web hosting company.
Jamie Spencer
Latest posts by Jamie Spencer (see all)
- How to Start a Successful Cryptocurrency Website - September 12, 2024
- 50+ Ways To Advertise Your Business For Free On The Internet – 2024 Guide - September 5, 2024
- The Fastest WordPress Hosting Providers 2024 – If You’re Not Fast…You’re Last!!! - July 8, 2024

What exactly does it mean to “self-host?”
Do I need a seperate external hard drive or server?
Is BlueHost.com an example of self-hosting software?
Self hosting means that you buy your own hosting to then host your website.
Bluehost is a self hosting provider.
When I started my blogging journey then my first question was, Why I should choose WordPress and not other CMS softwares.
I searched a lot about it on Google at that time and I found that everybody is recommending to use WordPress and I started doing the same.
Now today I know that why people should choose WordPress. Because WordPress is an independent and easy to use content management system.
The best thing about it is, We can bring any feature in our website with just using a single plugin. That’s really good. :D
I am using WordPress since last 3 years and I loved it. :D