“Build it and they will come.”
Most people who begin a new blog or website start with the above idea.
Perhaps, you do too.
Maybe you’re thinking that once you launch your website or take your business online, it will open the floodgates to sales.
It’s true: starting a new website is your first step to succeeding online, but it’s really just the very FIRST step.
You can create and launch a website within hours, but what do you do after that?
Well, you just…
WAIT.
You wait for traffic.
You wait for leads.
And you wait for your life to change.
I’m not saying that you should aim for instantaneous success.
Of course, you’ve to keep patience when launching a new website, but just how long can you wait before you finally pull the plug?
Now you’re probably wondering about the sites that pick up really fast, like within months of a launch?
You know what’s common in all of them?
THEY LAUNCH RIGHT.
They get indexed fast. They don’t get penalized by search engines. And they provide a great user experience right from the go.
And I’ve put together this checklist for you so that you too can do all the above (and more) and get that smashing website launch you deserve.
For each point in the checklist, I have added a detailed how-to section showing exactly how you actually tick that item off the list.
(I don’t want it to be something you just bookmark, I want you to do it.)
- Tell Google about your new website
When you launch your new website, your first step should be to tell Google about it. Because that’s where people go to search.
The surest way to tell Google about a new website is to submit a sitemap to Google.
To do so, you’ll have to first create a sitemap.
- Tell Bing about your new site
Hands down, Google is the leading search engine. But does that mean that you can ignore Bing?
Stats indicate that you shouldn’t.
Search Engine Land reported that a whopping 20% Search Market Share in the US Went
And it’s understandably so. Lots of PC users end up using Bing for searching as Bing is the default search engine in Microsoft’s Internet Explorer.
Once you’ve submitted your sitemap to Google, you should submit it to Bing as well.
How to create (and submit) a sitemap:
So what’s a sitemap?
Simply put, a sitemap is a simple text file that lists all the pages on a website.
Google recommends all new sites to create and submit sitemaps.

Here’s a list of tools to create a sitemap for your website. Most of these tools will create a downloadable file that you can manually add to your website files on your host.
If you’ve a WordPress website, you can use a plugin like Google XML sitemaps.
Once you install and activate the plugin on your website, on its settings page, you’ll find a link to your sitemap.
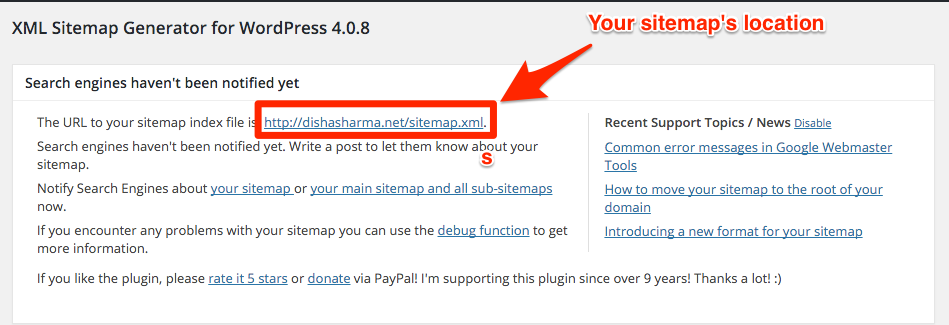
Just copy it and login to your Google Webmasters account using this link. Choose your new website, and hit the Add Sitemap button.
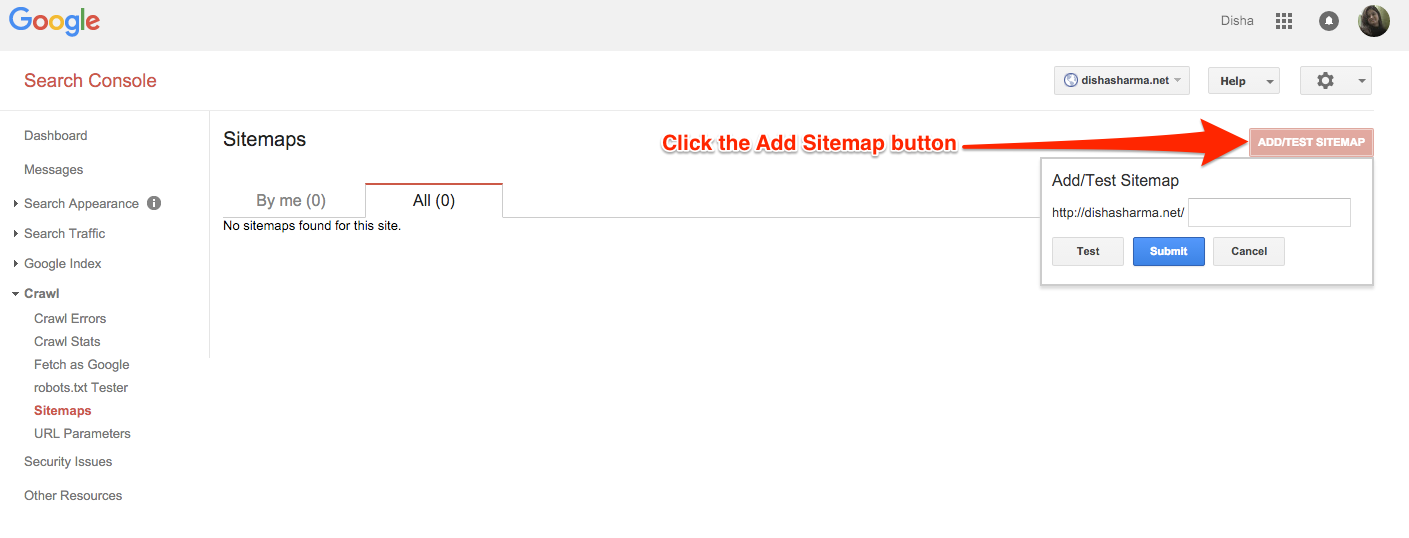
Now copy the sitemap location you picked from your plugin’s settings page, and paste it as the sitemap’s location in the next step.
 And you’re set!
Now head to Bing Webmasters Tools and click on the add site option. (It’s the first thing you see after logging into your account.)

After you add your new site’s URL, you’ll be prompted for its sitemap.
Again, add the same XML sitemap location as you copied from your plugin’s page.

- Choose the preferred URL format
Do you know that nearly 29% of websites face duplicate content issues?
And most of these duplicate content issues happen because search engine bots find the same content on different URLs on your site.
For example, your homepage could be present at www.yourwebsite.com as well as at yourwebsite.com.
You might argue that both these pages are the same.
True.
They are the same.
But search engines view and count them as different.
Not only the above two, other variations such as the following too will be counted as different.
- www.yourwebsite.com/
- yourwebsite.com/
- http://www.yourwebsite.com
- http://www.yourwebsite.com/
- https:www.yourwebsite.com
So when you start a new website, choose your preferred format of the URL.
It could be anything — the www or the non-www version, or the https instead the http version.
Whatever it is, you need to stay CONSISTENT.
Not setting the preferred URL (and keeping consistent with it) will result in your new site getting linked to using different link formats. So the values of the inbound links (or their SEO juice) will get diluted. Like a high authority site might link to http://www.yourwebsite.com/ and another one might link to http://yourwebsite.com/.
Since search engines view both these pages as different, the SEO value of the backlinks will split.
Start by standardizing using either of the www or the non-www version of the URL.
Next, communicate with your team the link format that should be shared. For example: http:yourwebsite.com and not http:www.yourwebsite.com or http:yourwebsite.com/.
You are taking care of this step right while launching your website because it’s when a website is new that it doesn’t have any backlinks, and so it’s the best time to choose and stick to a consistent URL format.
As a website grows and starts getting linked to, the problem of inconsistent URLs can cause duplicate content and link dilution issues that I just discussed above.
- Install Google Analytics and other analytics software
Installing Google Analytics is another way of telling Google about your new website.
Besides, you’ll also need it for analyzing your website traffic and a zillion other things.
WordPress users can use a plugin like Insert Headers and Footers to add their Google Analytics scripts to their sites.
(Refer this post for a step-by-step process to install and get the plugin running.)
- Provide “enough” original and valuable content
Search engines don’t like to rank thin content as they feel that thin content doesn’t provide real value.
So make sure that you’ve a respectable amount of content on your website.
Also, don’t embed keyword-rich content into images because search engines cannot read images, and so you’ll lose precious SEO value from them.
Use your keywords in your title tags (write a unique title for each page) and H2 tags. Search engines use this information to understand what a page is about.
- Check your content for grammar and style issues
Now grammar and style aren’t known to be factors in the ranking algorithm. However, poor grammar and wrong language usage could hurt your website’s credibility.
If your work is littered with grammatical mistakes, your audience will not take you seriously.
So before your website goes live, proofread its content to ensure that it’s free of embarrassing typos and other errors.
My favorite tool to check my work for any grammar errors is Grammarly.
It comes with a free Google Chrome extensions that you can download here.
Another tool that you might want to try is ProWritingAid.
You can just copy your content into its free proofreading editor, and it will highlight all your errors.
7. Get rid of all the dummy text
Lots of website owners forget to check their website for filler text like lorem ipsum.
So before taking your website live, make sure that you’ve replaced all the dummy text that your designer might have used or perhaps your WordPress theme added.
If people find instances of dummy text on your website, they won’t take you seriously. And when too many people abandon your website as they land on it, your website’s bounce rate will become too high. Something that will send a bad signal to the search engines.
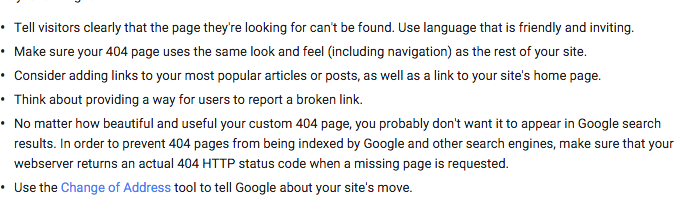
- Create a 404 page
404 errors are practically unavoidable. No matter how careful you are, an instance or two of 404s can creep in.
To handle 404 errors on your website, create a dedicated 404 page.
Lots of people get very creative when creating 404 error pages, but you can keep it simple as Google suggests.
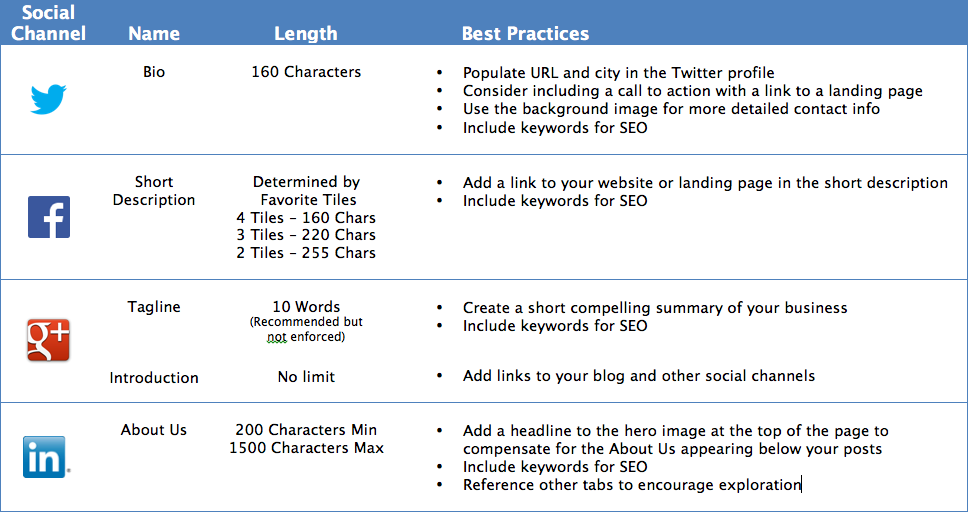
- See if all social media profiles contain an optimized bio
According to Social Media Examiner, 83% of marketers indicate that social media is important for their business.
So if you’re launching a business website, clearly, you can’t ignore social media.
But writing click-worthy bios is an art.
This brilliant Buffer post about writing social bios gives you a step-by-step walkthrough of how you can create winning social bios.
To sum up the post’s tips:
- Avoid cliche (i.e., words like experienced, effective, responsible, etc. )
- Use keywords (i.e., words that are important to your business)
- Mention your value proposition (As Neil Patel says, “Choose the most important things you do; state them in a clear, compelling way”)
Also, you can get a head start by referring to the following cheat sheet from Unbounce.
Don’t forget that images are an important part of the social media bio mix. Jamie has created an excellent resource about social media image optimization that will help you get all your social images right.
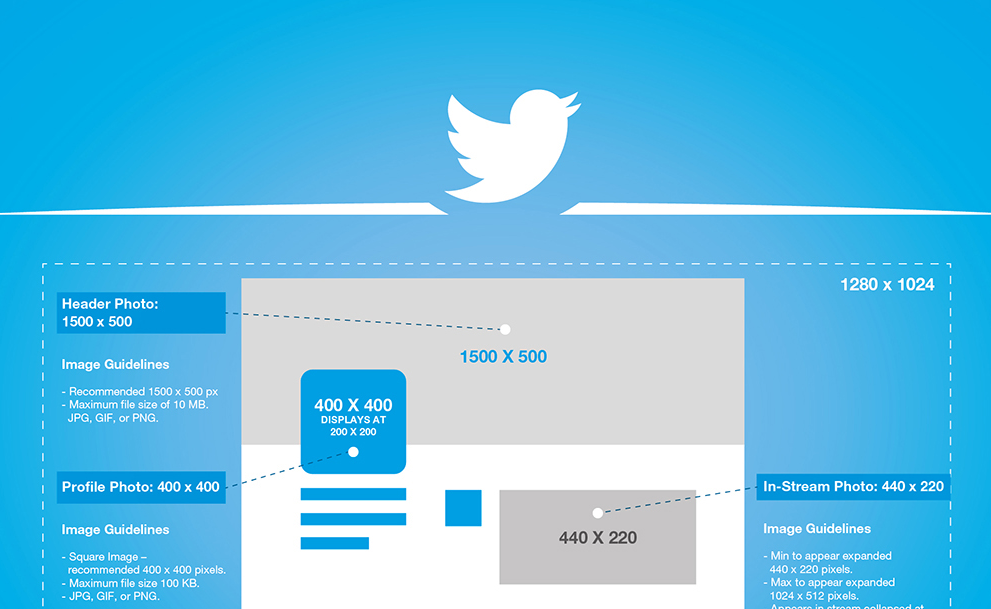
It’s full of tips and information you’ll need to create great-looking and visually-appealing social media profiles.
Also, make sure that you add links to your social profiles on your website.
For example, when you create your Twitter profile, link back to your website from your profile bio.
Your first few backlinks could come right from your social media profiles.
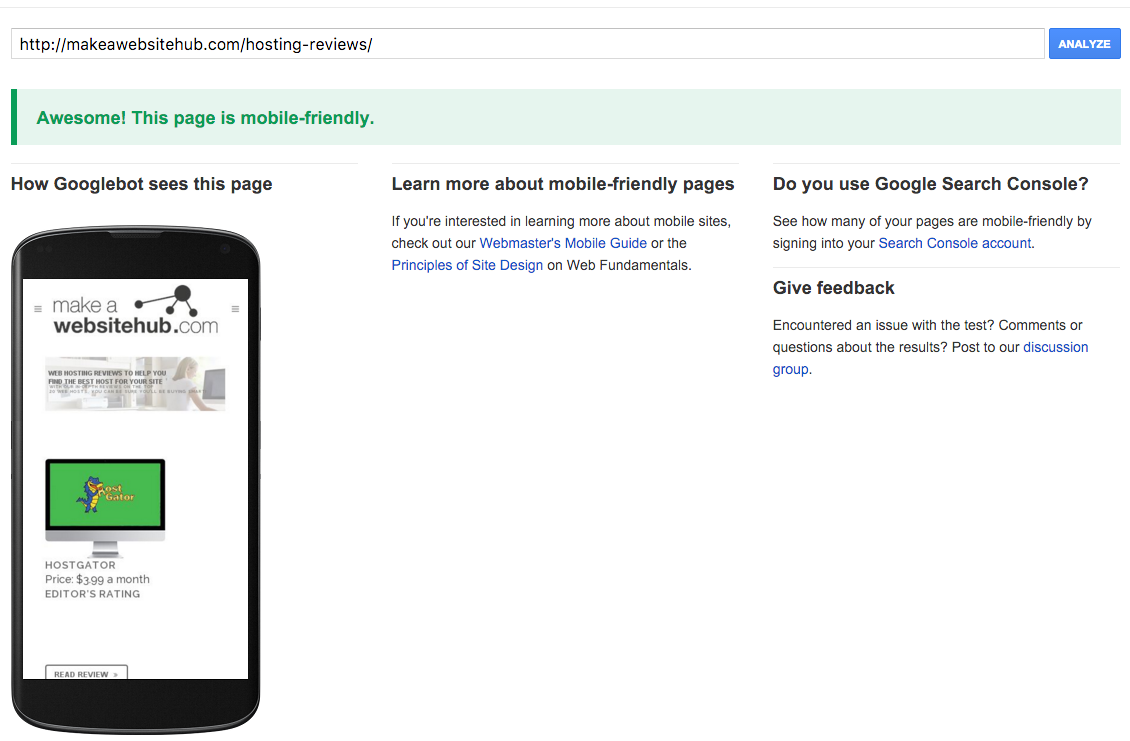
- Take Google’s mobile-friendly test
Make sure you run your site through Google’s mobile-friendly tool.
Post Google’s mobile friendly algorithm, Google is only showing mobile-friendly websites for mobile search results.
So if your website isn’t responsive or mobile-friendly, you’ll not get any organic traffic from mobile devices.
To test your site, just go to Google’s Mobile-Friendly test tool, and input your site’s URL.
The result will tell you if Google finds your site responsive.
Like when I ran MakeAWebsiteHub through it, I got a green score.
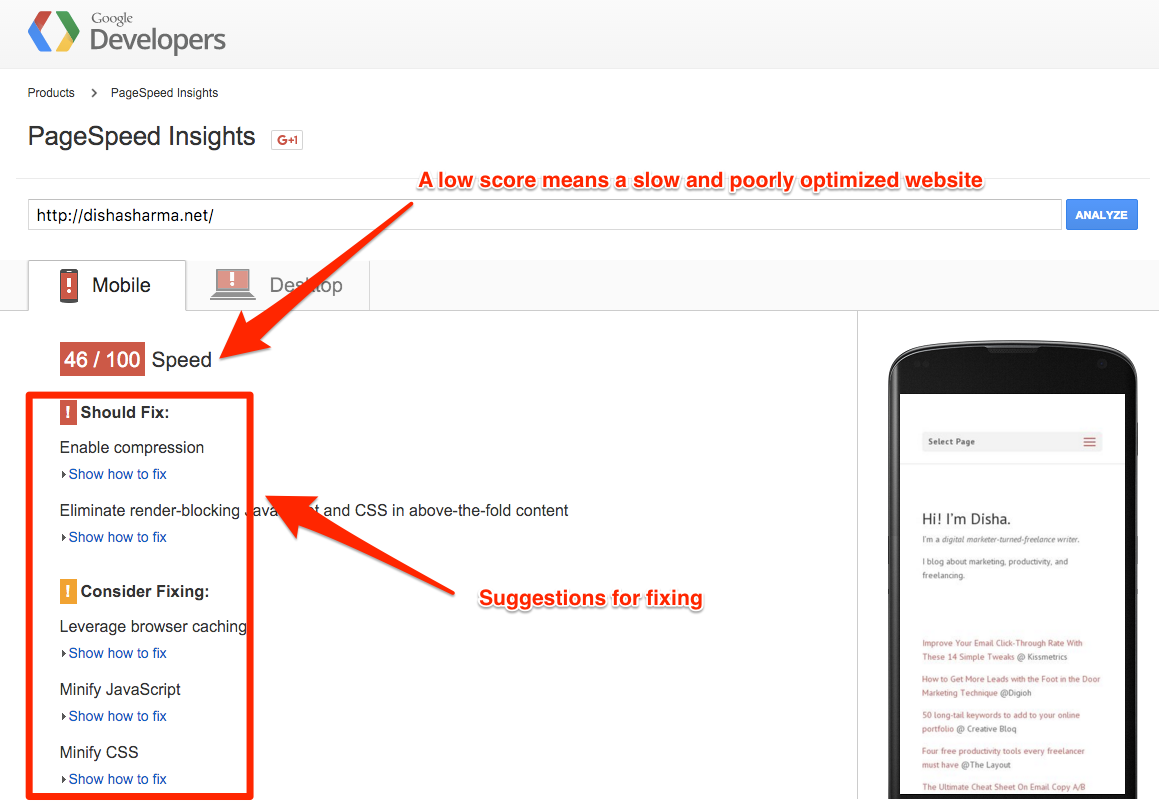
- Run Google’s PageSpeed Insights test
Google’s PageSpeed Insights tool evaluates your site’s speed performance.
A blazing fast website doesn’t just extend a great user experience, but also helps in ranking a site better in the Google search results.
To test your website’s performance, just copy your website’s URL and paste it into the Google PageSpeed Insights tool.

Google PageSpeed Insights tool will analyze your website and give suggestions for optimizing it. Joe Fylan has some great tips for speeding up a WordPress blog.
(You might need the help of a developer to optimize your website for some the tool’s suggestion.)
Pro tip: the first thing you’d want to do to improve your site speed is to enable Gzip compression. Most managed WordPress hosting services have this enabled by default. If your hosting provider hasn’t done this, contact them.
- Optimize for Pingdom’s Website Speed Test
Pingdom’s Website Speed Test is another tool for analyzing a website’s performance.
After pasting your website’s URL and running the tool, go straight to the performance tab.
Under the performance tab, you’ll find suggestions like enabling Browser caching, minimizing redirects, and more.
- Add the right legal pages
Different countries have different compliance rules but some rules almost always apply to all.
Like lately, a lot of countries have started requiring their websites to conform to the EU cookie law — you know, the one, where you’ve to ask your website visitors to accept your cookie policy (and also your terms of use).
If you’ve a WordPress site, I’ll recommend that you get a plugin like EU Cookie law. It’s a free plugin that lets you get approval from your website visitors about your cookie usage.

Another very important page is the Privacy Policy page – again many countries make it mandatory to add this page.
If you plan to participate in affiliate marketing, another useful legal page/notice that you might want to add to your site would be the affiliate disclosure page. Essentially, an affiliate disclosure notice tells your website visitors that you participate in affiliate programs. Lots of affiliate programs make such disclosures compulsory for their affiliates.
Here’s another free WordPress plugin: Guerrilla’s Legal Pages.

It comes packed with 3 ready-to-use legal page templates
- Privacy Policy
- Terms of Use
- DMCA Policy
Please review the content before publishing.
- Send yourself a test message using your contact from
There’s no real use of a website that people can’t use to contact you.
After all, that’s what you build a website for — to get new business leads.
So after you’ve pushed your new website live, test your contact form.
Your contact form must include the captcha field too because lots of web spamming bots will contact you about ranking your site and offering all kinds of services.
Wrapping up…
It’s not uncommon to search for your brand keyboards and see all sorts of websites show up. Your website maybe nowhere on the search results page. This is especially true for new websites.
But by using the right keywords in the important tags and by getting your site indexed immediately, you’ll start showing up soon.
Besides, by extending a user-friendly experience (fast, mobile-friendly, etc.), you can get raving fans right with your launch.
Your new website is your brilliant chance to build long-lasting relationships with your audience, so put your best foot forward.
Do you’ve any questions about any of the above steps?
Disha Sharma
Latest posts by Disha Sharma (see all)
- What is Cornerstone Content (and an Easy 6-step Process to Create It) - March 22, 2022
- A 14-point Checklist for a SEO-happy Website Launch - March 8, 2016
I am glad that i find your your blog before starting my new website SEO…thank you so much for sharing your experience…
Glad to hear that Mark! Please share it with your friends :)
Nice article! A very informative post. Thanks for sharing!