A Simple Step By Step Tutorial Showing You How To Create A Stunning Blog In Just 20 Minutes.
If you’ve been planning to start a blog but didn’t know where to begin, then you’ve come to the right place!
In this tutorial I will help you get your first blog up and running in around 20 minutes.
I started my first blog back in 2008 and it has completely changed my life for the better.
My name is Jamie Spencer and I have been blogging as my main source of income for the past 10 years. I have created and sold a wide variety of blogs in different niches which means I am in a great position to help you start your own blog.
I’ve designed this beginners guide to blogging to show you how to start a blog online in less than 20 minutes even if you’re a complete blogging novice, whether you’re 18 or 80. It really is that simple and straightforward.
There is no technical jargon within this guide that will leave you confused.
If you do get stuck on any part of this guide, then please feel free to email me. You can contact me here. I will get back to you within 24 hours, I promise!
In this guide I’m going to run through exactly what you need to do to setup your own blog.
So, before we get started just be aware that building your first blog can take up to 30 minutes. It might make sense to bookmark this page if you are planning to start a blog when you have some extra time.
Disclosure: When you purchase a product or service through links on this page, we earn some commission. This helps us to keep this site running. There are no extra costs to you at all by using our links.
In order to Start A Blog you will
need to work through these 5 simple step-by-step stages:
1. Choose a blogging platform
2. Pick a Domain Name & Web Host
3. Install WordPress on your hosting account
4. Design Your Blog
5. Launch Your Blog
In this tutorial we will be building a blog with WordPress. Please do not skip any steps.
STEP ONE
Choose Your Blogging Platform
A blogging platform is the software used to manage your blog. It allows you to create blog pages, add content, images, video and everything else that you would need to do when updating your blog. Another name for a blogging platform is a CMS ( Content Management System).
There are lots of different open source platforms which most web hosting companies will support when you are creating your blog. The main blogging platforms are:
- WordPress – is the most popular and customizable content management system (CMS) in the world
- Ghost – is a new blogging platform that is creating a lot of noise in the blogosphere
- Drupal – is quite popular but is difficult for novices
- Joomla – another fairly popular CMS but there is a very steep learning curve
- Blogger – a free blogging solution from Google
Why You SHOULD NOT Start a Blog on a Free Platform
Plainly and simply I will never recommend someone who wants to start a successful blog to use a free platform such as Blogger or WordPress.com. While there is zero barrier to entry and no up front financial cost to you, there are lots of concerns which could cost you more in the long run. If you can, then you should always self-host your blog.
When something is free, YOU are the product
Because of this fact a platform such as Blogger or WordPress.com can shut you down at any point, with no warning and no way to recover your content. A minor indiscretion such as using an image without the right consent can have your site deleted and no way to challenge it.
No Customization
Usage of ALL the free plugins and features are very limited. And if you want to customize your free theme to make it stand out from the crowd, then just forget it. You can’t do this on WordPress.com (free version of WordPress)
It looks unprofessional
Many of the free blogging platforms do not let you have a custom domain which gives across an unprofessional appearance to potential customers and subscribers. You are also very limited with the level of customisation you can do to your blog so your site looks just like everyone else’s.
It’s hard to make money from your blog when you don’t own the domain or hosting. Most free blogging platforms will not allow you to place any adds or affiliate links on your site. So how can you make any money from the traffic that you have being working hard to build? Answer: No chance.
Many Limitations
The free blogging platforms give you very little in terms of web space. You might get 5GB if you’re lucky. For today’s websites this is just not enough when you consider uploading images and videos to your blog posts.
SEO
Your blog’s performance on search engines will no doubt be effected by hosting your content on a free blogging platform. Servers are slower which will impact on your rankings, as well as the fact that Google favours custom URLs over shared sub-domains such as myfreewebsite12345.wordpress.com.
So what should you gather from this guide so far?
Don’t go for creating a free blog, because it will restrict you at every stage.
If you think that starting your blog on a free platform now and moving to a paid solution later on is the best way forward, then think again!
Migrating your free blog from a free blogging platform to a better paid option can be very difficult and time consuming.
What you should do when creating a blog
The best way forward is to build your blog on a platform like WordPress where you will own your website and content 100% because you are self-hosted and you have your own professional / personal domain name. You won’t have any limitations and you’re free to monetize your website, which is vital if you’re wanting to make money online from your blog.
Paying for web hosting for your blog is not very expensive and can cost as little as around $5 per month for very simple hosting packages. Having a reliable web host will mean that your site is backed up regularly and you have rights to recover your website for any reason.
Why I Recommend WordPress for Starting a Blog
Well to begin with my website makeawebsitehub.com is built on WordPress, and over 30% of all websites and blogs on the internet use WordPress.
Over the past few years I have worked with all of the well known blogging platforms but always recommend WordPress to blogging novices due to the great community support and ease of use.
It’s INSANELY simple to set up.
You will see just how easy later in this How To Start A Blog guide. To give you some idea to how simple it is, my 9 year old daughter set up her own blog with ZERO help from her expert dad (that’s me by the way).
So easy to use.
Managing your blog, adding content, adding images, amending content and much much more can be done with absolute ease in WordPress. The platform has an extremely intuitive interface so adding new pages, blog posts, etc. can be done very quickly. Out of the box WordPress ticks most of the boxes you will need for your new blog and if it doesn’t there is probably a plugin out there for you.
Blogging is at the heart of WordPress.
WordPress was designed and built for bloggers as a blogging platform so all the blogging capabilities and functionality are already built-in and waiting for you. If you want to set up an email subscriptions to your blog, then this can be added via a plugin in just seconds. That’s the great thing about WordPress, you can literally set your blog up and publish your first blog in a matter of minutes.
Total control.
With WordPress, you have total control over your site. There’s no waiting for a web designer or developer to amend your content. You can just login to your dashboard and make changes yourself.
WordPress is secure.
As long as you keep your WordPress platform and plugins updated with the latest versions, and you adhere to secure password best practices, then WordPress is a damn secure place to have your site. WordPress update their software all the time to make sure that it continues to be secure and keeping hackers at arms length.
Excellent support & vibrant community
The WordPress community is vast, vibrant and always will to help out. Check out their support forums to see just how good it is.
You can read more about my thoughts on self-hosted WordPress vs WordPress.com
STEP TWO
Picking A Domain Name For Your Blog & Setting Up Your Web Hosting
In order to set up a blog you will need a domain name and web hosting. If you are new to starting a blog then I recommend that you register your domain & hosting with the same company to keep things simple.
Domain Name: This is your website address i.e. the domain name ( blog name ) for this website is makeawebsitehub.com. Try to choose something short and catchy for your blog that will be easily remembered. I recommend that you stick to .com domain names if at all possible as many of the new domain names aren’t as easy to recognize.
Web Hosting: This is where your blog is stored online. There are lots of different hosting companies out there which offer different types of hosting for a variety of different types of websites. The WordPress platform is free of charge but you will have to pay around $3-4 per month for your Web Hosting and Domain registration fees.
Affiliate disclaimer: I recommend Bluehost because I use them on a lot of websites that I own or have built for clients. I also truly believe they offer a superior service to other hosting companies. All Bluehost links on this page are affiliate links which means that I will get commission if you buy hosting with Bluehost via one of my links. This helps me to run makeawebsitehub.com and keep all the guides on this site free to use and share.
The Best Place To Buy Your Blog’s Domain and Hosting.
I personally use and can highly recommend using BlueHost.com to start a blog because of their simple installation process, great customer service & reliability. They’re also recommended by WordPress.org as a top host since 2005.
Over the years, I’ve tried dozens of different WordPress Hosting providers, so I suppose you can call me an “expert” at choosing the hosting for my blogs. If you want to learn more about what is on offer then read my web hosting reviews.
Once you have decided on which web hosting company to work with you will need to install WordPress on your account. I have created a guide on how to install WordPress on a variety of different web hosts.
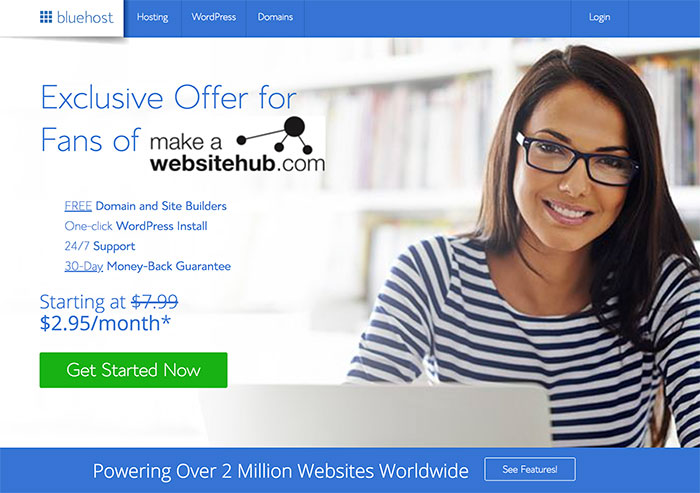
Additionally if you sign up to BlueHost today, you will get high quality hosting from just $2.95 per month, as well as a FREE domain name worth up to $15 for the first 12 months for your new blog too.
Use this link to get a free domain with your hosting.
If you’re unhappy with your BlueHost purchase within 30 days, they will give you your money back.
When you sign up for hosting with BlueHost there are some additional services they offer. Domain Privacy Protection means that people won’t be able to see the name, address and contact details of who owns the blog, if you’re happy for people to know who owns the blog then you can deselect this and save yourself about $12 per year.
Starting a WordPress Blog On BlueHost
Click on the “Get Started Now” button to start the process of creating your very own blog.
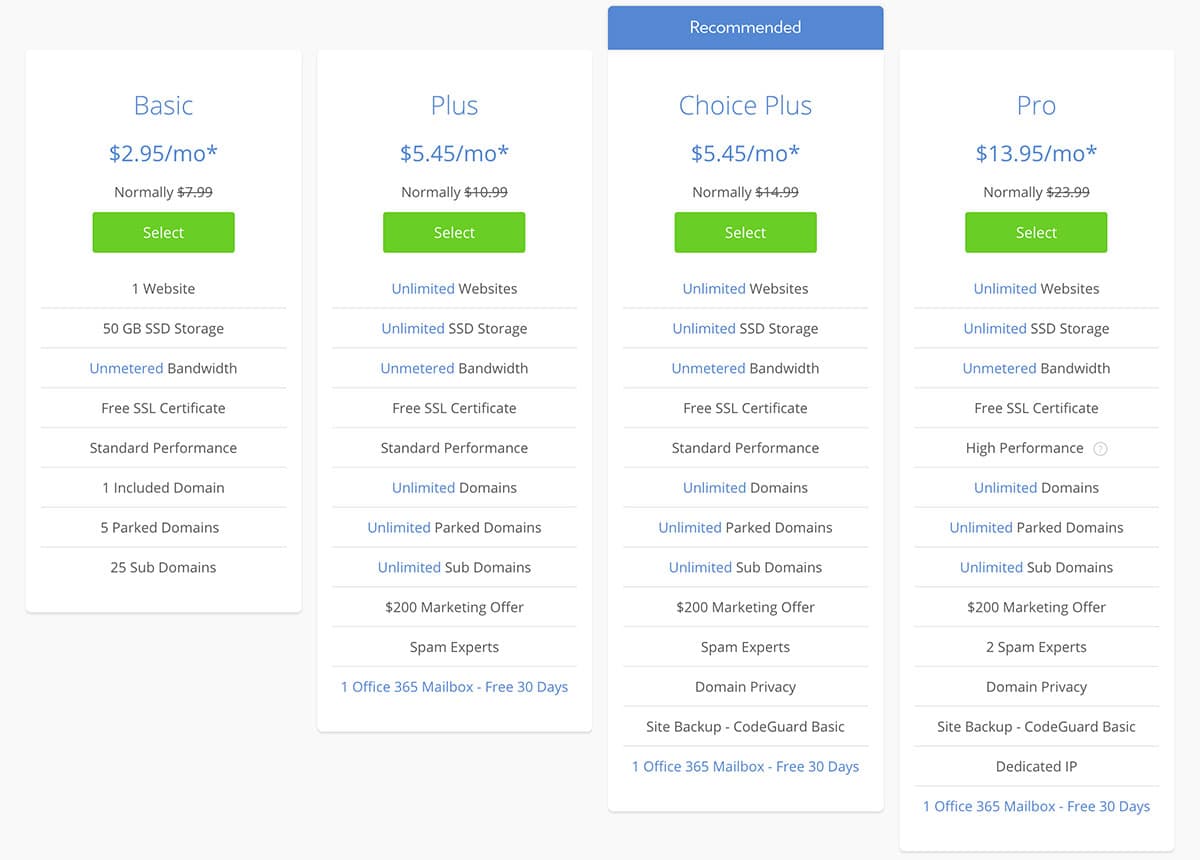
Next you’ll need to select the right plan for you and your blog. I recommend either the Plus or Prime packages. You can start off with basic if you like and upgrade anytime you feel you need more features to run your website.
Once you’ve selected your plan you’ll then see this page…
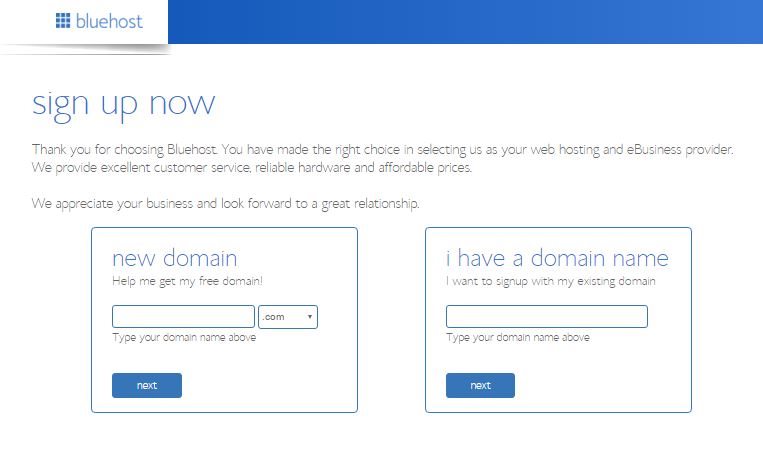
If you already have a domain name, from another domain name registrar, that you want to use; then just enter it in the right hand box and then click next to assign your domain name to your new hosting.
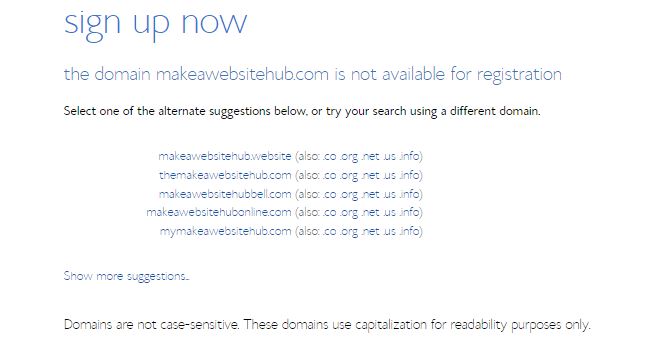
Let’s say you don’t have a domain name and you want to claim your free domain.
Type in the domain name that you’d like in the left hand box where it says “New Domain” and then click next. If it’s available then you’ll be able to proceed.
If it’s already registered then BlueHost will cleverly show you some similar domain names that you might want to consider. Or you can just type out another domain name idea to see if it’s available.
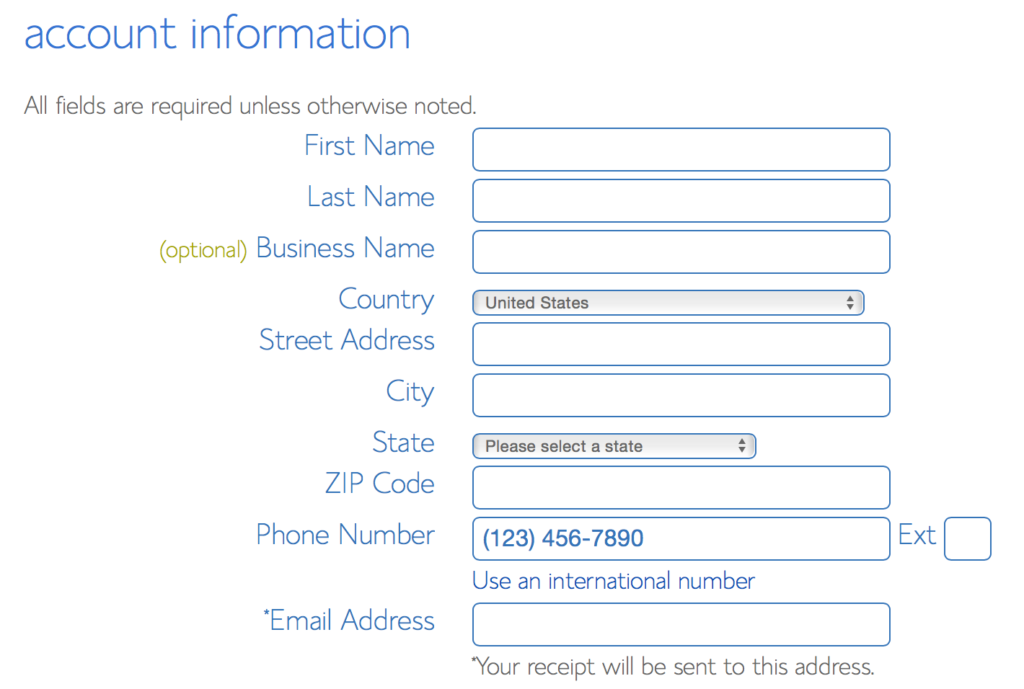
So you have found the domain name of your dreams and you’re now ready to set it up with your new hosting. The next screen you’ll see is the domain registration page where you will have to put in all the boring details such as account information, but this takes no time at all.
Once you’ve filled out the domain registration form, its then time to select your hosting plan. You’ll find this section directly below the account information section.
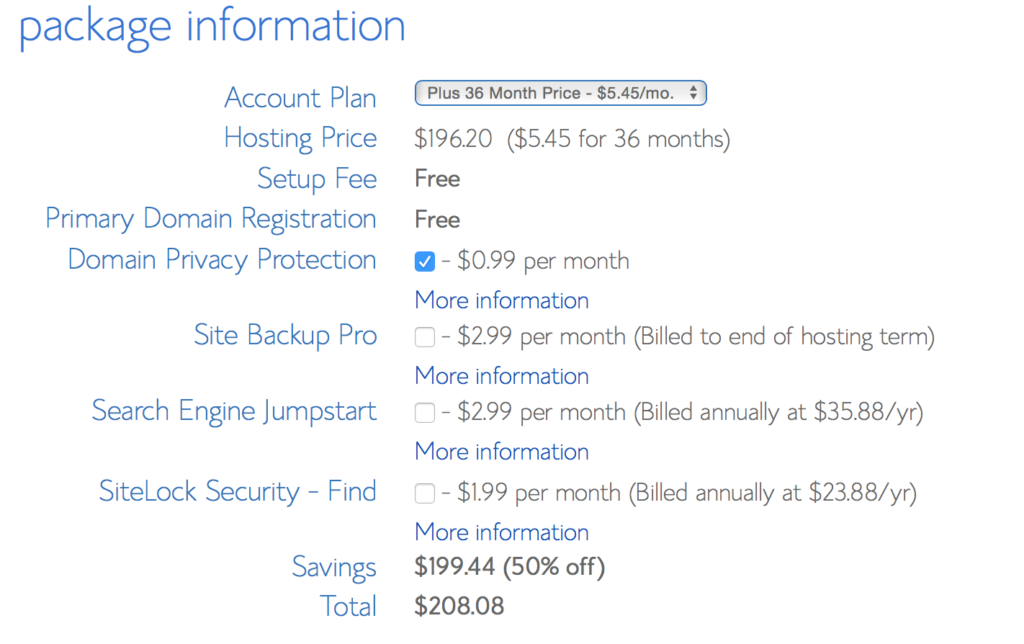
I normally suggest you select the Plus or Prime plan at 36 months to get a better deal on the hosting, but 12 or 24 months is fine also.
I normally don’t click any of the other options as they’re not essential however I do recommend getting domain privacy if you don’t want anyone knowing who owns the domain. The great thing about the Prime package is this option is free.
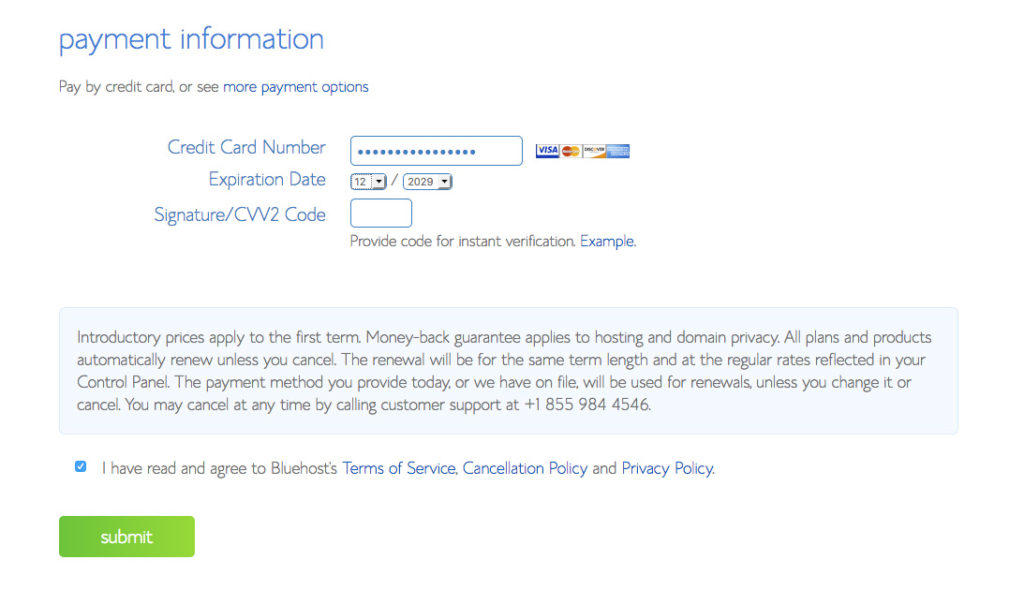
Then scroll down and fill out the billing information, click submit and you are done!
You should then receive an email from BlueHost with all your account and login details. Check your spam folder as it can sometimes end up in there if your email client is a little too sensitive.
Keep your login and welcome information safe as you may need it for future reference.
The next thing you’ll need to do is to create a password for your WordPress dashboard login. This is the page you’ll see next after paying for your hosting package. Simply click on the green button to create your password.
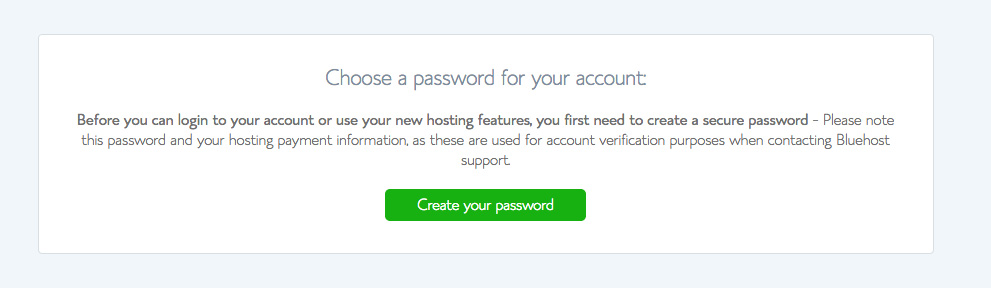
On the next screen, you’ll need to put in your desired password into both fields. My advice to you would be to make the password over 15 characters with a mix of numbers, upper and lower case letters and a few special characters such as $%*(*£!.
Make it hard as possible for those hackers wanting to get into your blog. Once you have a long and complex password, make note of it and click next to move onto the next stage.
STEP THREE
Installing WordPress On Your Hosting
So you’ve signed up and paid for your BlueHost hosting. Great! You are nearly there.
The next thing you need to do is to login to your BlueHost account with the details they sent you in the welcome email.
Once you have logged in you’ll see a big blue button saying “Start Building” – press this.
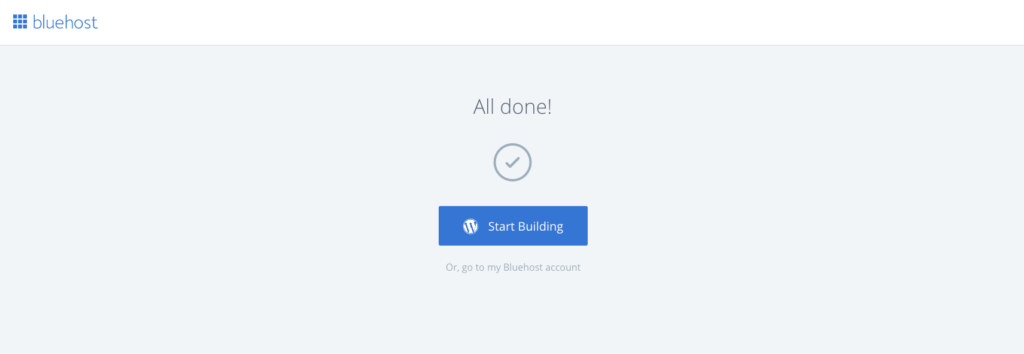
It will probably take about 5 minutes for them to load WordPress on to your hosting account. Once WordPress is loaded you can then login.
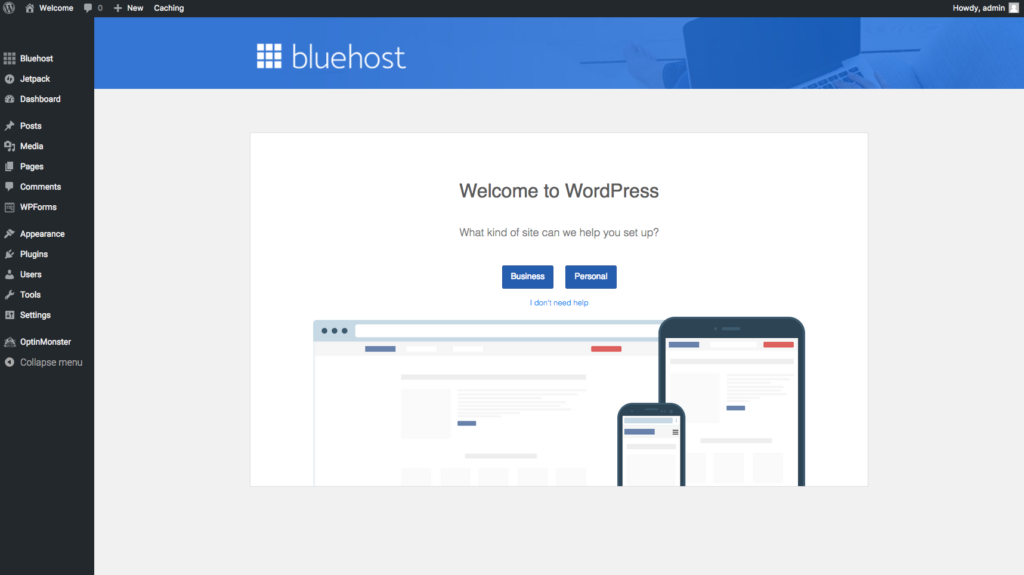
If you are following this tutorial then you can click the link that says “I don’t need help” and on the top left of your WordPress screen you’ll see a “Bluehost” menu, click that.

From here you can add blog posts and pages, change the theme (design) of your blog and upload any plugins.
If you get stuck, I have put together some links to useful free and paid WordPress tutorials
STEP FOUR
Choosing a WordPress Theme
Now that your WordPress blog is built you need to add a WordPress theme that has all of the functions that you need, a WordPress theme is a pre-designed template which you can customize.
Right now you have a choice to make you can either go with a free or a paid one. There are of course advantages and disadvantages to both so it comes down to what you want from your blog.
Some of my favourite places to find themes for blogs are:
- Themeforest
- StudioPress
- GeneratePress
- WordPress Library
When you are choosing your theme you want to make sure it fits with your goals. For example, if you are writing a professional blog then you will want a formal clean design where as a music blog you will have more license to show off your creativity.
These days you should now been using a responsive design. This means that the layout of your blog will adapt to different mobile and tablet screen sizes – which is highly important for usability now that a lot of people are using mobile phones to browse the web.
How to Install your new Blog Theme
Your new theme will come in a .zip file format if you have purchased one. You have the options to upload it straight into your WordPress Dashboard by logging into your WordPress blog.
When you log into your WordPress site for the first time, you will see this view of the dashboard.
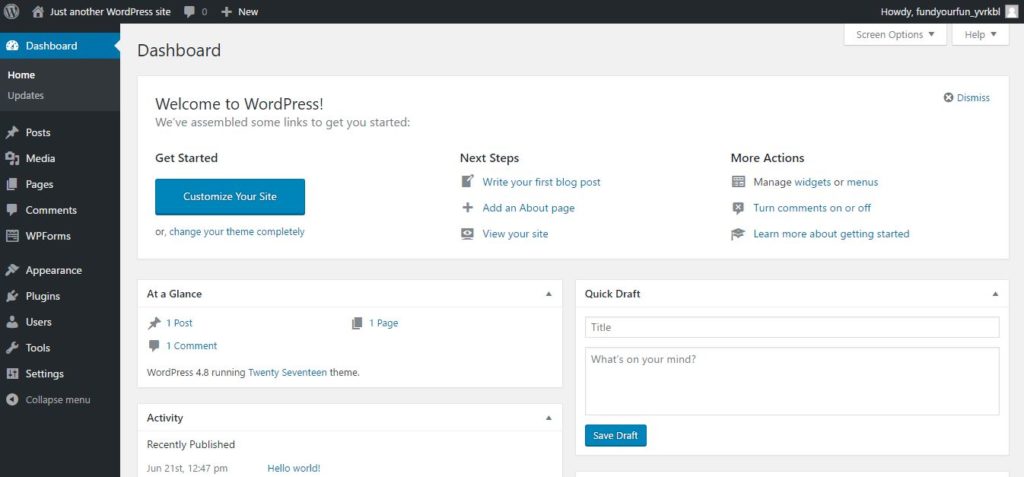
Move the mouse over “Appearance” tab within the dashboard sidebar, and then click on “Themes”. This will open up the Themes page within your WordPress dashboard.
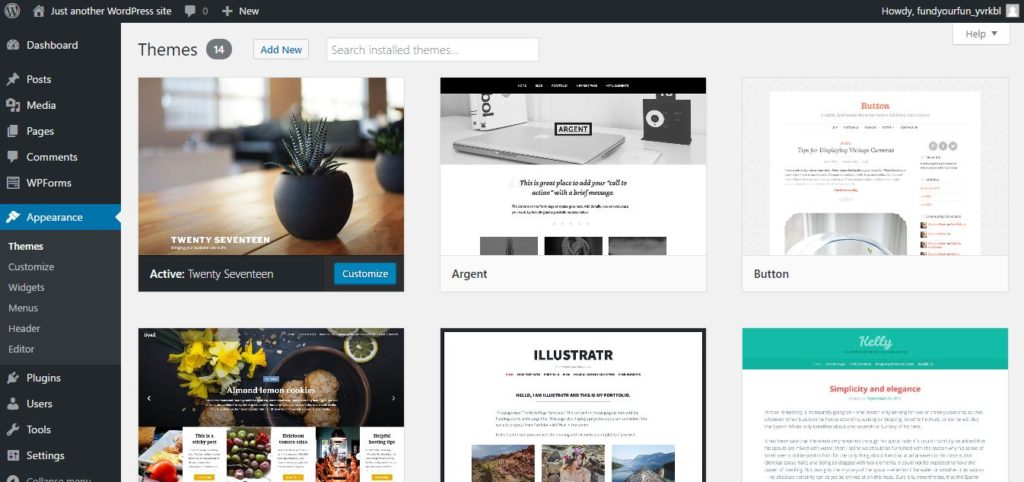
You can then either install one of the free themes that you’ll see available to you on your Themes page dashboard or you can install your own Theme that you may have purchased or downloaded elsewhere.
To install a free theme that’s already on your dashboard pre-loaded, you simply press the Activate button under the theme you want. See below:
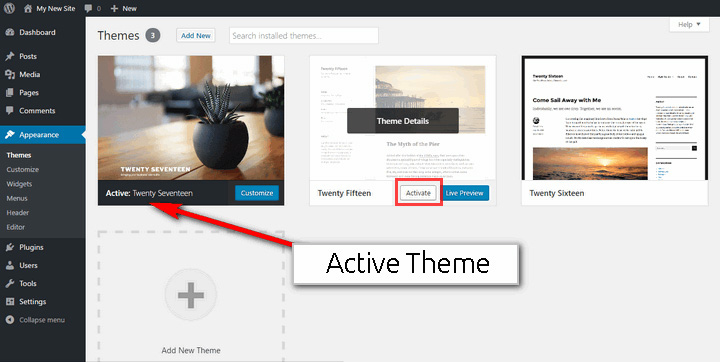
Remember that you can always switch back to your old theme if you don’t like the look of the new one. That’s the beauty of WordPress.
If you don’t want to use any of the themes on your dashboard, click Add New to start looking for a new theme to use. This will bring you to a page where you will be able to search the many thousands of free WordPress themes that are available to download and use on your site.
Here you’ll see four tabs, Featured, Popular, Latest and Favourites. You can also use the search bar to find more themes, as well as being able to customise your search with specific filters, such as searching for themes that are ideal for businesses and that only have 2 columns.

Uploading your own theme from Zip file
To upload your own premium theme that you may have purchased from sites like Themeforest, you simply do the following…
APPEARANCE >
THEMES >
ADD THEME >
UPLOAD THEMES ( You’ll find this at the top of the page next to “Add Themes” page title.
You then upload your theme .zip file just like you would adding an attachment on to an email.
You’ll now have a pretty blank looking theme set up and waiting for some love. At this stage you want to fill out all the basics like your logos, social media links and other things.
STEP FIVE
Launch Your Blog
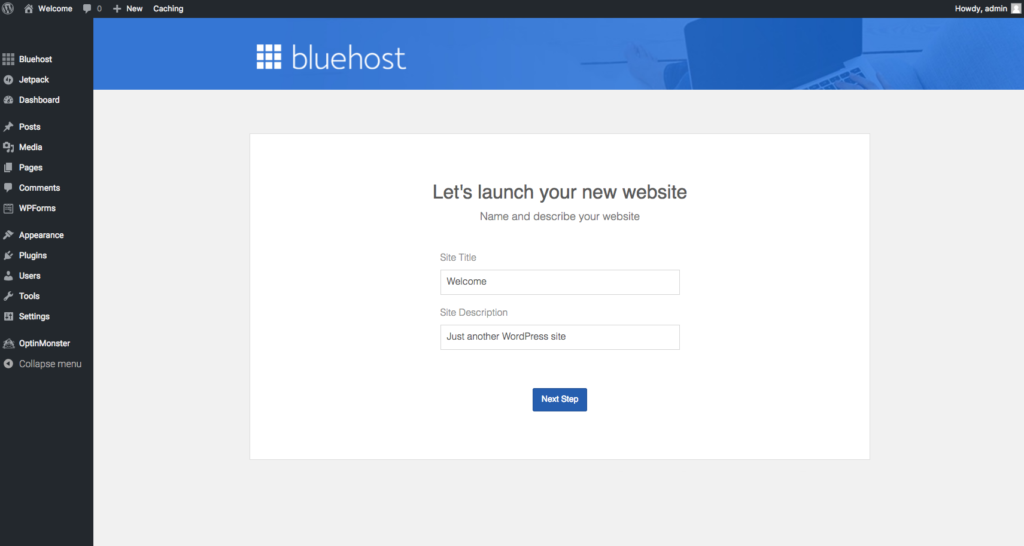
Now once you are ready to launch your new blog for other people to read it – you need to click the blue “Launch” button on the Bluehost page
Make sure you fill in the name and tagline for your new blog.
…And that is it!
Congratulations you have now taken the first steps to starting your new blog!
FAQ’s About Starting a Blog
#1 Is Blogging Still Relevant?
Yes, blogging is still growing – Blogging is now one of the most popular ways of communicating and spreading information and news online. There are millions of blogs online and everyday you delay in getting started with a blog is another day wasted.
Blogging is a great way to express yourself and share your ideas, creativity and knowledge. Become a thought leader in your niche and leverage that authority for your own gain.
Blogging will help you to connect with other people who share your interests and also become a better writer.
2. How do you make money from a blog?
It’s no big secret- There’s a lot of people out there making a lot of money from blogging. The reason why these people (including myself) are making money from their blogs is because they have never given up, and they have chosen their niche wisely. Blog about what you know, and what you are passionate about to start with. At the same time, have an idea in mind to monetize the blog (advertisements, affiliate offers, products, ebooks etc). If you put the work in, you will get your rewards.
If you want to learn more then read my guide to on how to make money with blogging or my post on making money online.
3. How long does Blogging Take?
Around 20 minutes – if you already have some ideas about what type of blog you want to start, then this tutorial can be completed quite easily within 20 minutes.
As for regularly writing new blog posts and promoting them then it will take much longer. I regularly write one to two blog posts per week for this blog and it takes me about 3 hours per blog post. This includes writing, editing, adding images and promoting the blog posts to my social media followers and email list.
4. Can I start a blog for free?
Yes – there are lots of free blog platforms out there, Blogger.com is the most popular free blogging platform out there. I would not recommend setting up a free blog if you plan to use it professionally for business or to make money from in the future. You also will not have custom domain name either.
5. How do I setup an email account for my blog?
I have created an in-depth guide on how to setup a free email address with your BlueHost web hosting account.
Hey jamie! Im 10 years old and im pretty new to this stuff and my mom has a website for her coffee business and my dad is a store manager so i wanna start blogging and i dont know how i wanna learn and help my parents get money and i dont know if blogging is for me but im trying it and what are your opinions in this?
Thanks Joan.
Glad you found it of great use.
Hey Jamie,
I read all the tutorial and found it amazing .You have expressed each thing in detail .The truth is I want to start my own blog so I read your blog to get a rough idea on how to write it and found it very amazing. Actually I want to ask you if you have any idea of writing historical blogs for I was thinking to write about them .If u know any such sites with historical blogs pls tell me .I surely will be grateful to you .
Thanks.😊
Historical blogs like this one https://englishhistory.net ?
Hi Jamie!
Can I create the blog on my iPad?
Yes absolutely.
Outstanding post Jamie, well done! And thanks for the hard work. I also love using Blue Host and particularly appreciate their top class support. I’m using Blue Host with WordPress installed as my site builder. You gave me a few new ideas, thanks.
Hi!
I’m planning to start a blog for my hobby, but English is not my first language. I want to try blogging in English but I’m afraid my grammar is not very good and my vocab is limited. Do you think I should just try it anyway or just blogging in my own language? I was thinking to mix the languages as in 1 post in whole English and another different post in my own language. What do you think?
Please help advice. Thank you.
I do have a few questions that I’m hoping to get your amazing advice on.
Q1: I am truly interested in starting a traveling blog with different ways to save and what sites and adventures you can have on a budget, my question is how would one do that from the very beginning especially being the sole income of the household?
Q2: What helped you figure out which niche was the right fit for you?
Q3: About how long after putting in consistent work did you see growth in your blog enough to do it full time?
1. Building an audience takes time and tenacity. You have to love what you’re doing. It’s not going to happen over night. This is a 2 year project. If you write engaging and useful content, then building an audience will be a lot easier for you. My advice to you is to
– create content that your audience would want to read.
– evergreen content is key to your success. No point spending time and effort on content that will outdate in a few months. Example: 100 Best Things to Do In NYC at Christmas will always bring in traffic and will not need changing at all for years.
– make sure you create content that will attract traffic organically on Google. Free traffic is the best sort of traffic. Highly targeted and FREE!!!
2. Again, I made sure that what I was writing about, I was also passionate about. My thing was helping people to make money online / start their own blog. There’s so much I can write about and endless affiliate programs I can sign up to in order to monetize the traffic.
3. I didn’t see any money come in for a good 18 months. But I knew what I was doing would get traffic and would help to build a loyal audience.
2.
Hello
I am trying to purchase on Blue Host. My question is do I need to purchase the extras, i.e. Domain privacy and protection, site lock security, etc. I dont know what these mean and of course increase the cost.
Thank you!
No. All you need is hosting. All the other stuff that they try to sell you is really not needed.
I’m new to blogging and would really love to start my own blog. The only problem is that I just don’t know what to blog about or how earn money with it. Can you please give me an idea!??
Hi Lilya
Sure I can!
Here’s some blog examples that you can take inspiration from.
Here’s a guide I wrote about How to make money blogging.
I hope this helps you out.
Hello Jamie,
I need your advice. I need you to hold my hand and walk with me towards creating a blog. I am a novice in writing and I have not blogged before. I have written a motivational book. The title is: “No One Can Beat You In being You At Your Best!” It has 29 Topics and 112 pages. I have inserted motivating/inspiring/spirit-lifting free-for-commercial-use images from Prixabay (I am a subscribed member) and motivational quotes. I have had it self-edited, scanned and rescanned for unintentional grammar and plagiarism, using Grammarly and DupliCheck software tools. I don’t have funds to print massive copies for sale without knowing if it will sell sufficient copies to make at least a break-even return on the potential investment.
I am thinking that it might be a smart idea if I blog a page on the first week of a month and respond to comments for three weeks and blog the next page the following month and so on. At that rate, I can blog for 9 years. I will then insert a pic of the Front Cover and Back Cover of the book on the blog page. I will then have the book available on eBook for those who might be interested to order and read the full book. I will send a sample of the content to you over email if you wish.
How dumb is my idea?
Fred I think this has a lot of potential
You might also want to consider doing some keyword research for each of the topics / pages you plan to cover to make sure each post covers a pain point for people who might be searching Google for a solution to their problems.
Jamie, I have one professional website on Wix that I am happy with. Years ago I created a business website that I was also very happy with – it required quiet a bit of programming compared to what is available today. I have begun developing a Blog that I plan to monetize. I have already prepared 20 plus blogs that I can add affiliate link into, and have material for many more blogs.
I started using Weebly, free version so I could test it out before I actually build the blog site, but finding many small isues. The Editor gets hung up or downloads at slow speeds (many users have placed compliants about it in the Community section of Weebly). Even though it is drag and drop, I still find navigating thru the different tabs in order to build the website challenging with extended learning curve. Blog posts, blog pages and standard pages confuse me. Which is why I ended up at your site.
Your info is valuable and easy to understand. Is BlueHost with Wordpress.org the best option for my needs?
P.S. I will use your links! :)
Hi Kat
I think it’s a great combination :)
If you get stuck at any point – please get in touch.
Jamie
Hello Jamie,
Thank you for such a detailed article. I’m very much interested in starting my own blog and earn through it. I was excitingly following all the steps and I chose Bluehost Prime package for setting up my account but I was disappointed to know that I had to pay the total amount altogether now which I thought I was gonna pay every month i.e. $5.45. Is there any way I can pay every month instead of paying the total amount now? Or could you please suggest me something I can start a blog for making money?
Looking forward.
Bluehost doesn’t offer a monthly payment plan. Hostgator does, but this ends up very expensive at around $10.95 per month for the hatchling plan. Other hosts that offer monthly payments are inmotion and cloudways, but again they are all of a similar price structure. Best thing to do is pay up for the whole year to gain the savings.
Do I need any special kind of computer or laptop?
No. As long as it can connect to the internet, you’re good to go.
I am planning to start Blogging in the near future & i found this information very useful. Thank you very much. I’ll get back to it if i got stuck in any step!
Make sure you drop me an email with the link so I can share it with the Makeawebsitehub.com community. Thanks and good luck.
This is very useful information for me as a beginner blogger. I figured to try blogging as a project while working on my MBA program online this year. I haven’t finished publishing my blog site yet. Still checking out some tips and advice prior to publishing. A bit nervous but after reading other new bloggers helps build my confidence. Hopefully, I get the nerves to publish by the end of January. As you mentioned, I ended up using WordPress and Bluehost.
Hi. Please I don’t understand the first step. When you said to use WordPress, do I download the WordPress app from play store to get my blog started, or will I sign up with WordPress online? Please shed more light on this. Thanks
Hi Victoria
If you buy hosting via Bluehost, you will need to one click install WordPress on to your server. This is the easiest way of getting set up.
If you are starting a blog via WordPress.com ( non-self hosted option – FREE ) then you will need to go to WordPress.com and set up a free account.
This is a great article and it’s especially nice that you are answering the questions around the WordPress issue. I find that lots of people still ask me about the difference between WordPress.org and WordPress.com and it’s quite surprising that it’s still so much of an issue. Anyway just wanted to say I love the post and it is very helpful for new bloggers so thank you for sharing
After reading the whole article, i think this is one of the best article for every new blogger or new peoples who want to create a new blog. The content of article is really new and really helpful with a very easy to understand language and methods given. Thanks a lot for sharing such a good and helpful article. Thanks again.
Nice Article. I think WordPress is the best platform to make a website. Anyone can start blogging and can earn from it. Nice Informative Article. I also have added some points in my article. kindly Look into it.
Hello Jamie,
Please is WordPress.org and WordPress.com same site of similar function?
Similar in function, but .org has more features and more capabilities for you to customise your site, as well as being able to monetize your traffic.
Hi Jamie. Do I have to pay hosting monthly or annually?
With Bluehost you have to pay it all up front for the whole year. It works out cheaper in the long run. Or you could go with a host like Hostgator where they will charge you monthly, but generally this is a more expensive way of paying for your hosting. It works out near to $11 a month for the cheapest package.
I am wanting to start a blog. I have been thinking about it for over a year now and haven’t taken the plunge. After reading this post I am seriously considering starting one. Just one question, does WordPress cost in addition to BlueHost? I understand there is a fee to use BlueHost which is fine. But I am wondering if there is an addition fee to use WordPress.org? Please let me know. Thanks!
No WordPress.org is free. You’re paying bluehost for your hosting which will run your WordPress installation.
Hi Jamie
Please can you tell me if the above steps for starting a blog, are the same steps as I would need to take to start a listicle blog such as those you see on social media? Thanks, Sarah
Yes its exactly the same. Once you have WordPress installed on your hosting account, all you then need to do is upload a theme that would work well for you to start a listicle blog. Mythemeshop is always a good choice for themes like that.
Well explained Jamie,
Thanks for the great post.
If you are very sure why you want to blog, it will help you understand and decide what you are going to blog about.
If you stay consistent on a subject, you can gain credibility and be considered an expert in your field
Hello Jamie, must say your blog is great and this article is really detailed. Great job bro
Timothy
Thanks for dropping by
Jamie
Dear Jamie
I like what you are doing here. I want to ask: If I want to have a discussion forum website (either open or membership) can I get that with wordpress (and bluehost)?
Thanks
Yes there are ways to create forums with WordPress – you can use lots of plugins to do that some are paid and some are free.
Yes for sure. Bluehost has one-click installs for forums.
Well explained Jamie,
Thanks for the great post. I have already started blog an running well but I have one question – If I change my theme then do I get any issue with Google ranking or backlinking?
Any changes to your website structure or design can have a positive or negative affect on your Google rankings. I’d try to use a minimal theme which loads quickly and isn’t full of unnecessary JS and CSS scripts.
Jamie, thanks for all the great information. I cannot find what I must do to have my number of articles appear in the categories. If I write 8 articles in xyz category and 5 in abc category the actual number of articles doesn’t show. Can you explain how to insert a plugin for that?
Joe,
It might be a case that the theme you have chosen doesn’t have that coded. You could hard code that into your theme –
$category = get_queried_object();
echo $category->count;
Read more
Jamie
Great post – very informative. Love the explanation on why WordPress is best – it makes so much sense! “It will restrict you at every stage” is the perfect way to put it. I used Wix for a while and it was SUCH a pain to switch over my website when I finally accepted it wasn’t right. It’s much better to start off on the right foot!
You just need a domain and a hosting plan to get your site live… For me, wordpress is the best website making platform to make a blog… btw thanks for sharing this informative post :)
Can I use my smart phone to start a blog?
You can but it’ll be very difficult – it’s better to use a laptop or desktop PC so your blog looks great & works as expected.
Once your blog is setup it’s easy to run a blog from a phone.
Hi Jamie,
Thank you for this elaborate explanation!! It was really helpful.
Hey, need your help with my blog. I believe, you’re the right person who can help me out.
I’ve this blog http://www.wordknowhow.wordpress.com, hosted in WordPress (free plan), which I started in 2013. It’s basically on MS Word tips and tricks. Worked briefly on it and developed 50+ posts. Later, I got busy with my professional life and couldn’t contribute anything significant in the last three years and was not keeping a tab on it.
Recently, I realized that few posts are doing really good, and overall the channel is drawing around 1000 visits (a little less on the weekends). Receiving a loads of encouraging comments, questions, and a few followers too!!
Not sure, is this of any significance to think of monetizing it. Can I see this as an opportunity to earn something out of it by contributing content consistently and building it even bigger and better?
My next question is: Should I buy WordPress domain and hosting or something else? If I buy something else, am I not going to lose my traffic, followers? WordPress domain seems to cheapest. What do you think? Is there any disadvantages with buying WordPress domain and hosting? Please help me these.
Hi Anupam
Ok so the problem here is the fact you do not own the domain http://www.wordknowhow.wordpress.com/ and is why I recommend my readers have their own domain name.
So we have two options here
1. Buy a domain name from WordPress.com for about $15 per year
2. Buy hosting, a domain and pay WordPress.com to redirect your visitors to your new blog
Redirecting your visitors to a new location with a 301 header is the standard solution to keep search rankings. Since you don’t have access to .htaccess on WordPress.com, you can not make any changes by yourself to retain search engine rankings.
However, WordPress.com offers a paid upgrade, Site Redirect, which provides this functionality.
Go to WordPress.com blog’s dashboard and click on the Store menu item. The upgrade you are looking for is called Site Redirect – this costs around $15 per year.
Ultimately I would favour moving to a self-hosted solution so as your blog gains more visitors you can continue to offer the best experience. I think if you did start writing more regularly you would grow your audience significantly, build up an email list and make some money from your blog.
I think as you are offering expertise I would suggest creating your own information products – this would mean you could charge people a small fee each year to access your advanced tutorials or some form of extra training.
For Example – http://chandoo.org/wp/ gets hundreds of thousands of visitors per year & it offers MS Excel tips and has made the owner quite a lot of money in the past 10 years.
-Jamie
Hey Jamie,
Great site and info here. Question. I have a small blog on tumblr. Can I port that blog over to WordPress/Bluehost and then continue to blog?
Absolutely!
To bring your Tumblr content to WordPress, go to your WordPress blog’s Dashboard (accessible in the drop-down menu under your blog’s name in the admin bar) and in the left-hand column of the Dashboard, go to Tools → Import. Choose the Tumblr importer: That link will begin the import process.
Then remember to shut down your Tumblr blog once the content has been published on your self hosted WordPress blog.
Fantastic information. I’ve been putting off starting a blog because I didn’t know what to do. This is very helpful.
Hello,
Great information on this page and I appreciate all the support you are providing. I have a few questions to understand what happens next. I agree that Bluehost is a great buy, and I have found the domain name I want; however, when I look at wordpress, it seems that linking the domain name requires a premium membership.
Does obtaining the domain and hosting on Bluehost change the fact that WordPress requires that membership? and would that mean that if I wanted to update my blog, I would not be able to use wordpress app because the update would need to go through Bluehost? I am thinking I am misunderstanding a few of the pieces here and hopefully you can provide some clarity.
Thanks!
Hi Jen
Forget about WordPress.com
When you buy hosting from Bluehost, along with your free domain name, you then can install the WordPress.org platform onto your web hosting server. There is no additional cost to this. It’s free.
Once you have installed it ( which is one click by the way ) you can then either install a free wordpress theme or buy a premium one from places like Mythemeshop or Themeforest.
You access your new site through yourdomainname.com/wp-admin
You then login with your admin username and PW to access the WordPress dashboard in order to update you site.
Hope this helps
Jamie
Thanks Jamie! The more I looked at wordpress, I realized you were referring to .org and not .com. I will look into buying through Bluehost and using your tips / guide to help!
Hi Jamie,
I just want to say that I think your site is excellent. Well done!!! I like your articles and appreciate the quick reference guides.
I have two major questions for you.
Hosting Question: I think I’m going with BlueHost for the hosting services but
1) I’m not sure if I should set each of the clients up with their own accounts on a shared server or if I should manage everything myself with a Virtual Private Server Hosting option,
Web Development Question: I do own Dreamweaver and Muse, and if I go with BlueHost, they provide WordPress. I’m pretty sure that BlueHost even offers Weebly’s web development program as well. But I’ve heard that sites made with WordPress and Joomla are the most seceptible to cyber attack. So I’m thinking that I’ll start off by designing everything in Muse, then as I get more proficient with Dreamweaver that I’ll switch over and use it exclusively.
2) Which platform is the best for load time, security, and saving space on the server?
Thank you for your assistance.
Regards,
Mike
Hi Mike
Hosting Question ( Answer )
Entirely up to you. Personally I would keep access to just you, so they don’t mess things up. That’s happened to me before when I gave access to my server to a client. If it’s a WordPress site, then maybe give them access to that, as they can then update small things themselves rather than bothering you. Or if you have a retained web management agreement, then you’d be doing these tasks anyway.
Web Dev Question ( Answer )
I have over 100 websites on WordPress platform and I haven’t been hacked as I follow all tips here.
As long as you have the right security measures in place, then WordPress / Joomla are great platforms to build you site on. Yes you can build sites in Muse and Dreamweaver, but if you want to give access to a client to be able to update content themselves, then why try to reinvent the wheel. Use a ready made platform to build on and customise.
WordPress is very light weight compared to Joomla. I have insanely quick load times for most of my sites.
Hi, it’s me again, with one more question!
So I have this free blog on .wordpress.com. Is it possbile to move it? I figured that since it’s free I could take my time to improve it, write an article once in a while, add pages (for example, redirecting to my etsy shop), add links, photos, my logo, customize the theme, etc. And when I decide my blog/website is good enough (that could take a while), I would buy hosting and a domain name with bluehost. Will I be able to take the content and design of my free blog and move it into my domain name and new hosting? I’m not exactly sure how I’d do that technical stuff.
Thanks a lot ! :)
Sure you can!
I have created a tutorial telling you how you can move from WordPress.com to WordPress.org
https://makeawebsitehub.com/move-from-wordpress-com/
oh my god you’ve got it all ! Thanks, that’s awesome
Hi ! There’s another thing I don’t quite understand about blogs…
Suppose I start a blog and write great articles, add a good title, the tags, add nice pictures to it then share everything on social media. Supposing also I don’t know much about SEO and don’t have time to read about it. How am I going to get decent traffic?
I feel like the entire web is encouraging me to have a blog and telling me I’m going to make money out of it but… Everyone and everyone’s grandmother have a blog these days so it seems very unlikely that mine would magically get noticed by lots of people. What are the reasonable actions you need to take to get traffic, once the posting part is done?
Thanks a lot for sharing your expertise :)
I don’t do much on social, if I’m honest, so I rely on others sharing my content on FB, Twitter, Pinterest, Stumbleupon etc. My thing is Google traffic and not the type you pay for. Organic traffic is best. Yes you have to have good on page SEO like Titles, descriptions etc, but the main thing is LINKS. Links from other websites linking to your content. It’s the biggest ranking factor, and one you have to do in order to get higher rankings and more traffic to the site.
The way I do it is to outreach to other sites. Send them an email and ask them if they’d feature your graphic, image, or mention your blog post in an article that they may write in the near future etc. etc.
With regards to the type of content that I create in order to get links, its mainly resourceful content. Stuff that people will get a lot of use from. Guides, cheat sheets, how to’s etc. Think about your niche and what you can create to help people out. So if you’re into hippy stuff, then maybe you can create a guide on all of the hippy type events, festivals, conferences, meet ups that’s going on in 2018. Create a calendar graphic / guide / wall chart that people can download and then email every single hippy related website / organisation / festival organiser and tell them about your content. Ask for links, featured posts etc. There’s loads of stuff you can create to get your blog rocking! Stuff like this will set your website apart from the rest of the sites in your niche.
Thanks, it’s great to have advice on what really works for someone in real life :)
Hi Jamie! I’ve just read your platform comparison and How to start a blog article. Great info, thanks a lot!
I’m looking for a new source of income so I’m exploring the blog option (for ads, affiliate links and promoting my Etsy printables shop) but I work full time already. I see tons of “How I made 50k in two hours from my blog while raising 5 kids and working a full time job” kind of articles but, let’s be real. is it really possible to make some money with a blog if you don’t invest much time in it? (or are these articles just another way to get you to click on affiliate links)
My other questions are more technical. If I do start a blog, I’d want to go big (I mean start very small, but have options available for growth). Let’s say a couple years from now I need an online shop, is it possible with WordPress, or should I aim for a website that contains a blog? I’d also want a mailbox (info@mycompanyname.com), is it something I can get with Bluehost? I’d also want to send newsletters and offer free downloads directly on the site. Are these things you can do on a blog?
Thank you very much ! :)
Hey! Thanks for leaving such an awesome comment. You’re right, there is a lot of bullshit out there saying that “you can earn $30k in your first month online” etc etc. People push this BS hoping that someone will be inspired enough to swallow the BS and buy whatever they are offering through those affiliate links.
Anyway, back to your questions:
Q1. Is it really possible to make some money with a blog if you don’t invest much time in it?
A1. In my honest opinion, NO. If I look at my site that I created here, it wouldn’t be attracting over 400k hits a month without hard work and time invested. All I say to you is, if you don’t think you have time, then try and make time. Watch TV for 2 to 3 hours a night? Do you take x5 1 hour lunch breaks per week at work? There’s always a time eater that you can do away with in order to work on something that can change your future. And it doesn’t have to be a blog that you work on!
Q2: Let’s say a couple years from now I need an online shop, is it possible with WordPress?
A2: Damn right you can. You not heard of Woocommerce? Check it out! WordPress is super versatile and easy to use.
Mailboxes can also be created with Bluehost or any other host for that matter. Sending newsletters out can be done with programs like MailChimp or Awebber. You can capture emails using a WordPress plugin like WP Subscribe which is available at MyThemeShop. This links up to MailChimp and Awebber as well as a whole host of other email subscription software.
Good luck with your blog and do make sure you keep me updated as to how you get on.
Jamie
Thank you so much ! Honest opinions seem rare these days! I don’t have much time eaters but I suppose I could start very slow and make two or three bucks someday :) I do have a wix website now and I like that it’s drag and drop but some stuff don’t always work like they should so I might start over on wordpress when I can.
Hi Jamie Awesome article on how to start a blog. I will take your advise and try to make a great blog for my start up business. I will share your blog on Facebook as well.
Thanks a lot!
Getting the domain registered, etc, was not so bad… I got stuck so on many of the details. Things like understanding categories. How should I pick the words to provide a category? Or the difference as to why I would use a page vs a post. I have a fixed front page, but then I couldn’t fathom if the initial things I wrote about should be a handful of pages (to be followed by continuing posts? Sigghhhh…
And then experimenting to see how different themes reacted. In a couple of the themes a few of the pages did not work exactly as I hoped. One would not separate the paragraphs, but I wanted clear paragraphs! They don’t all work the same and some of them drop information that I wanted to keep. Some of them won’t show the feature images at all. Or maybe they just drop a descript of the name. Or the menus make the page look more cluttered.
So I began playing with themes to see how they look. That part has become the time filler of my day for the moment. The more I go through other people’s (like you), the more I begin to edit my approach. And what I interpreted my end goal to be about. Aw yes, the end goal…
Sometimes I almost hold my breath to make a decision.
AND I AM SO HUMBLED AND APPRECIATIVE BY THE FACT THAT YOU ARE HERE OFFERING ADVICE. When I first saw people blogging, I couldn’t understand how they made any income. And information was not so readily available. I might just get it up and running this time. I feel more hopeful. My site is not published yet. I feel optimistic. Thank you.
Thanks Deb for taking the time to share your experiences of starting up your own blog. I’m humbled knowing that my tutorial has given you the confidence to jump right in and create a blog that will eventually become a success for you.
Sometimes you just have to dive into the deep end and create something, no matter how basic it is or messy. Done is better than perfect, and in time you will learn to make it perfect. It’s worth trying out different things like customizing themes to see make them to what you want them to do, testing out different types of content to see which one resonates with your viewers etc.
Good luck with your project and if I can be of any assistance, then please feel free to email me direct (hello at makeawebsitehub dot com)
is the domain registration diff from web hosting fee?
Yes, Winston your domain registration is separate from your blog Hosting. You can pay the same company for both though.
Actually creating a blog these days can take only a few clicks which is absolutely amazing for the non tech-savvy amongst us, great post though I’m sure it will get a lot of people started in their blogging journey.
It has certainly helped me out and I thank you greatly for that. All the best Jamie
Hi Jamie and thanks for great advice on how to start a blog. I have also looked at your comparison which is great! I still wonder which platform you recommend when the blog is supposed to be more a community for sharing advice and tips among many user in a magazine format? I find it hard to figure out which platform will support this in a good way. Hope you can help.
Thanks a lot!
Margrethe Gotschalksen
Margrethe
Thanks for stopping by. If you’re looking for a community platform and magazine layout then it’s WordPress you need. I’d have a look at some Magazine WordPress themes to see one you’d like. Here are some good themes on Themeforest.
Good luck with setting up your blog.
Jamie
Hi Jamie,
I live in India. I did my Masters in Management from London, UK. I have work experience in Fashion Sales & Operations. Currently I am working as a Manager in a corporate firm.
Could you please suggest a good platform for me to start as a fresher. Besides I’m also in dilemma to start a blog on Fashion or Managerial skills. Please advise.
Many thanks
Shoyeb Nagori
A great platform to start on is a platform that you want to stay with a develop your blog over time. There’s no point in starting out on one platform to then find out that its not fit for purpose. I suggest a self hosted site on the WordPress platform. It’s really easy to get a blog up and running with WordPress, and it will scale up with your abilities.
There are free alternatives as well that might suit you. I have a blogging platforms comparison here, which might help you further.
I am looking for a Site Title…are there any sources out there that can help me generate a title? I want to have a catchy title, but nothing too fancy. I want simple. I am an educator who loves using technology. I want to start blogging to help others and gain new ideas from others.
Hi Rose
I take it by “Site Title” you mean domain name. There’s plenty of blog name generators out there that will help you come up with a name for your blog in a matter of seconds. In fact I wrote a piece on just that subject. Have a look at a few of these options https://makeawebsitehub.com/blog-name-generators/
Thanks
Jamie
Thanks so much for this detailed tutorial. It has really assisted me in developing my website and blog… i have decided to integrate my blog and website as one. Thanks again!
This is a wonderful post about How do I start a blog. This post has inspired me to start a blog and this post really helps me to gain a boost. If you are happy to invest the time then coaching and your own info products can be highly lucrative. So this post will be a highly inspirational post for every visitor who wants to start a blog.
Hi Jamie,
Is it better to start a blog that is integrated to my website (WordPress) or set up an independent blog (WordPress)? I have both and my blog is going to be about branching out my current activity which lies in art & design field. What are the pros and cons of both options? What is the trend?
Thanks in advance,
Emilie
Emilie,
It will all come down to your goals.
If you are going to write about your work, activities related to your career and showing your expertise then I’d say have the blog on your existing website. This will help your audience get to know you and why they might want to work with you or buy from you.
If you plan on writing about a variety of topics, then it might be better to keep that separate from a work blog. Of course with running two websites/blogs you may incur more costs such as additional hosting and domain name renewals. Many web hosts these days allow you to run several domain names under one account as long as you aren’t getting lots of traffic.
Regards
Jamie
Hi, I am a student of microbiology and I want to create a scientific blog please help me.
Hey,
If you follow the steps I have laid out in this guide you will be able to get your first blog setup. As you are focusing on science it might be worth thinking if it’s a good idea to create an identity to promote your career or your interests.
Jamie
Blogs are very cliche nowadays. That’s why I’m going to try and start a blog that is very different and hopefully take blogging to the next level. I am thankful that I”ve read this article of yours as its so inspiring, and reading how you got to where you’ve got is just wonderful and inspiring to hear. Anyways, Is there a fee to helping me set up my blog?
Thanks
Eliza
Hi Eliza
I’m so glad that you’ve found my start a blog tutorial so helpful and inspiring. I don’t charge anything to help you install WordPress on your Bluehost server, just as long as you used my link to purchase it, as I get a small commission on sign ups, which will then help to cover costs of my time helping you.
Thanks
Jamie
Excellent guide Jamie! This site here is exactly the right site for everyone who wants to find out about starting a blog. You understand so much its almost tough to argue with you (not that I really will need to…HaHa). You definitely put a fresh spin on a topic that has been written about for decades. Excellent stuff, just wonderful!
One question I have for you… I have started a blog by using your guide but was just wondering if after time I want to change the domain name, can I do so without losing any of the traffic or authority that I have built up over time?
Hi Terrance
Yes you can change the domain name if after time you decide that you want a different URL. All you have to do is 301 redirect the old domain to the new one, making sure that the existing pages and posts do not change in terms of their URL structures. Also you need to keep paying for the old domain’s yearly reg fees to be able to keep the power that the domain has.
Hope that helps.
All the best with your new blog.
This is an unbelievably good “start a blog” guide! Thank you for all your help Jamie!
I now have my blog live and ready to make money, thanks to you!
John
Can you confirm that WordPress and BlueHost are as good for someone based in the UK as for people in the US?
Hi Karen
I can confirm this. I use WordPress & Bluehost for sites targeted towards UK audiences and it works just fine, hopefully the fact my site loaded quickly for you in the UK proves that.
Thanks
Jamie
I just wanted to say thank you for the very helpful post you created about starting a blog. I have always wanted to start my own blog, and seeing your post made me realize just how easy it would be to do so. I have since created my blog using your link for BlueHost, and I am ready to start what will hopefully be a very fulfilling journey for me and any potential readers who happen to stumble across my blog.
I’m glad you found this an easy process
Best of Luck with your blogging endeavours
Thank you so much for all of your helpful information – I’ve found this website very useful!
I am in the process of starting up my very first blog. It is just for a bit of fun and I am not planning on making a business out of it. The blog is basically music reviews and I was just wondering if you knew much about copyright laws in this field? Am I allowed to copy videos off YouTube for example?
Alice
As long as you use the relevant embed codes from Youtube to add videos to your site you should be ok to do that. I wouldn’t recommend ripping any content from a Youtube video and then hosting it yourself, this would be a copyright issue.
Jamie
I have been into wanting to start my own blog for years now. I finally am ready to do this! I am a single mom, who works a full time job, and want to make a little extra money by doing this on the side.
I don’t want to be like the same old “stay at home” mom or “single mom” that does a blog about their kids… I want to do try or do something different. Something I haven’t seen before. I just wanted to get some tips from you because you seem like you have done this for a while and you know what you’re doing.
Hi Nicole
Congratulations on taking the first steps to creating your blog.
I think the best thing to do would be have a look at my Online Business Ideas post, my blog post ideas list and read up on how to make money from your blog.
These posts might help you find a different angle or way of looking at starting a money making blog.
-Jamie
Hi there! I love your site! Very informative, and has me thinking about a lot of things I would not have come up with on my own.
My wife and I want to start a blog that will supplement our income and give her something to do from home, since she retired recently and is feeling a sense of boredom. So, we have talked through it and have come up with two ideas for blogs. One is more related to local information and may extend to vacationers. The other is more nationwide based on our vacation travels.
I like the thought of using Google Adsense, but I would also like to sell banners to businesses both local and national (depending on the blog). I know how to build websites, I have been developing sites, databases, and doing data analytics for 20+ years. I also have built a non-profit site using WordPress on GoDaddy.com. I am not impressed at all with GoDaddy.com, so I will be looking toward a different host.
Hi Mark
I would recommend my post on making money blogging as a good place to start, it has a step by step list of things you’ll need to do such as setting up a blog, applying for affiliate programs or Advertising networks and getting traffic to your blog.
-Jamie
Thanks Jamie
I finally got the courage to start the blog of my dreams!
This blog is in early stages and I still have to get up and running, but I am very excited about all of the possibilities!
I’m really glad I was able to help – good luck with your new blog
I’m planning on following your “how to start a blog” tutorial word for word soon. When I do step 3, will the domain name have a wordpress add on at the end? For example, would my website “example.com” turn into “example.wordpress.com?” In other words, if I pay for the domain name, will my webpage appear as just the name even if it is accessed via wordpress?
Thank you so much for your help!
Have you bought hosting from Bluehost?
Once you’ve done that:
There’s no need to visit the WordPress.com site at all, I hope that helped :)