How many times have you been asked for your business email?
Your business card would be remiss without one. In addition, customers for business emails to contact customer service, make inquiries, or schedule appointments. In fact, 75% of customers say that professional business email addresses are key to building loyalty with a small business.
Have you ever been embarrassed about giving your email to a potential client because it read badassdude6785@hotbot.com ?
Having an email address like this will give off the wrong impression in business and won’t do you any favours when trying to land new clients or build a successful company. Yes you can easily set up a free email account with Outlook or Gmail, but if you want to look professional when it comes to running your business, then you will have to ditch the free options available.
The Benefits Of Having A Professional Business Email Address.
Some of the benefits for creating an email address account are obvious. If you want customers to communicate to you through your website, your IT department may have already set up a professional email address to handle these inquiries.
But there are other reasons that you need a business email. Let’s run through the most important benefits…
Brand Name
Your brand name is reflected in the communications that you send to customers. If you plan on sending any type of promotions, then you want to avoid the spam filter and create a professional business email address where your brand will be recognized. You will need a customer email address to use email service providers like MailChimp or Constant Contact in order to send out marketing pieces and customer communications.
Customer Service
Your customer service email address will become the most popular as soon as you launch your website. People naturally have questions, problems, or just want help. You can make it so simple by having a customerservice@amazing-scooterz or help@amazing-scooterz.com to ensure that these customers are serviced quickly and understand they are talking to someone at your company with the right email address domain.
Professional Response
When you reply to customer inquiries and clients, you should have a custom domain that shows you are part of a real business and offer legitimate services. People may use the email address to go to your website, but overall, it sends the right impression when you are able to reply with a professional business email.
Sales
There is nothing worse than receiving an email from James333@yahoo.com who wants to do business with you. It says nothing about the product or brand, other than James has too much time on his hands and is cold emailing everyone he can today. Once you have a custom domain, you can set up sales email addresses that will help your sales team work those leads and send out inquiries to help grow your business.
Security
Business email accounts come with additional security options that you can set up using cPanel. For example, HostGator provides SpamAssassin to filter out and block dangerous hacking and phishing attempts of your email. This is important for businesses as a data breach can kill off your web traffic in an instant.
Spam Quality
Once you start sending communications from your business email, you will start to get flagged for spam, especially if you have a suspicious email address that does not relate to a verified domain name. Customers may flag your email for spam even if it is a legitimate communication just because they do not recognize the brand name. To avoid this, just use a custom domain name that matches your website, social profiles, products, and storefront.
Before you set up an email address, there are a few things to keep in mind so you leave the best impression on your clients and customers.
The Basics of Business Email Addresses
Creating a business email address is a little bit like setting up a website. If you have never done either, you will need to create a hosting account with a hosting provider like Bluehost or HostGator.
If you are not sure how to purchase hosting and want help, then jump to my Bluehost and Hostgator guides further down on this page. These two hosting providers are very friendly to beginners. While there used to be a lot of custom configurations, most of the setup is pretty standard and can be done in minutes from any computer with access to the Internet.
Most hosting providers include email accounts as part of an all-in-one hosting package. Even at this level, the host understands that as a business, you want a professional email address that is completely branded.
Definition of Professional Email Address
Before proceeding any further, it would be great to define what a professional email address is first.
In simple terms, a professional email address is defined as one that has your domain name or business name on it.
Essentially, these are email accounts that are not hosted on free email services such as gmail.com or yahoo.com to mention a few.
As effective as those “Gmail” or “yahoo” emails are, they do not look all that professional.
What Does A Professional Business Email Address Look Like?
While a typical domain name for a business email looks like this:
help@amazing-scooters.com.
And here’s what an unprofessional business email looks like: amazingscooters@yahoo.com
To begin setting up a business email address, you will need a custom domain. The domain name, in this example is, amazing-scooters.com
The first step will be to register a domain name for your brand or business. If you already have a website address, then you should use this for your business email unless you want to set up specific spam and security blocking for a separate email host or plan to have millions of traffic sent to a different add-on domain.
How To Find A Domain Name For Your Professional Email Address
The tool below will help you to find the perfect domain name for your brand / website and professional email address. Simply type in your desired domain name and it will tell you if its available to buy. If not, it’ll suggest the closest matches to that domain name.
Can I Set Up Business Email Addresses for Free?
Currently, there are no true “free” options for a custom business email with a web domain. You will at the very least have to purchase a web domain, which costs around $10 through most of the domain registrars out there on the market today.
While Microsoft did have a promotion in 2014 for free custom business emails, it has since shut the program down. Now you have to create a web domain before you can set up a professional, custom email address.
Bluehost and Hostgator do offer free domains when you purchase web hosting through them. I will go through this later on in this guide.
Business Email Tip #1: Always Use Your Website Domain
Unless you are living in 1999, the old Yahoo email address AmazingSc00terz@yahoo.com is not going to work. Instead, you want something like info@amazing-scooters.com. This business name email can work for customer service, inquiries, or anything else related to your company. People will know that it’s your business because of the email address, and they also have the website domain where they can find more products or revisit if you are sending out promotions to an email list.
Custom domains are a mark of professionalism. It shows that you have a real online business that people can trust and link to if they want to share products. This is why it is so important to have a custom domain for your business email address as well.
In addition, your email address is cleaner with a business domain. Customers will remember your domain and go to the link to find out more information, or they can share the domain with others on social media.
Business Email Tip #2: Do Not Use ISP Email Addresses
You may be thinking that an @verizon.net or @comcast.net is an acceptable business domain, but what happens if you no longer use that internet service provider in the future? You should replace any ISP email with your own custom domain as soon as possible.
This is confusing for customers and clients to see. Do you work for Verizon or do you have your own business? What is your business? These can all be answered by using your own custom domain.
Business Email Tip #3: Try Standard Email Formats
Your brand / business name may be quirky, but nothing is more frustrating than trying to reach customerservice@amazingscooters.com but realizing that it’s actually cust0merservice@amazingscooters.com.
The rule here is to keep things simple. You can stay on brand and create quirky email addresses for different functions and answering services within your business. Here are some examples of standard business name email formats using our amazing-scooters.com example:
hello@amazing-scooters.com:
Catch-all email address to put on social media networks, contact pages, and press inquiry pages.
press@amazing-scooters.com:
Email used specifically for public relations, press, and media inquiries.
customerservice@amazing-scooters.com:
This is an essential business function email where customers can request additional information, refunds, cancellations, and policies.
legal@amazing-scooters.com:
Is there a legal issue? You can send these to this email address.
john@amazing-scooters.com or john.melon@amazing-scooters.com:
For individual sales or employee addresses, you can create a naming mechanism that will suit the size and breadth of your company.
sales@amazing-scooters.com:
Do you have a sales department that can handle leads? Send traffic to this important email address.
There are a number of ways to set up your email address naming conventions. The best way to find these emails is to check out competitors or look at a favorite brand’s website. What names do they use in their email addresses?
In addition, you should never use numbers in an email address name. These are unprofessional and cumbersome to remember.
Business Email Tip #4: Set Your Name and Profile Picture
If you are using a typical email client with your business email such as Gmail, then you can change certain settings within your email address to ensure that people can identify who you are. This includes setting up your full name, profile picture, and signature (optional).
This adds credibility to your name so that when customers or clients email your address, they are able to see your name and know that they are reaching out to the right person.
Business Email Tip #5: Secure Your Email Addresses
Business emails need more secure passwords and spam filters than your typical address. Unscrupulous hacking, phishing, and spam activities can destroy your business email and even lead to more dangerous data breaches within your organization.
Some hosting providers will provide spam assistance. For example, you can use SpamAssassin with Bluehost to protect your business email accounts. This spam filter creates certain filters that will automatically block malicious spam activities, but you can also set up additional filters to catch other activities particular to your business and industry.
How to Set Up Business Email Using Either Bluehost or Hostgator
If you have a custom domain name, it is pretty easy to set up a business email account through service providers like Bluehost and HostGator. These hosting providers will allow you to create a custom domain or attach a business email to a domain that you already own.
For the purposes of this step-by-step guide, we look at how to set up business email from scratch.
Bluehost Business Email Step-by-Step Guide
To get setup with email using Bluehost, register and setup a Bluehost WordPress hosting account. The cheapest plans starts at $2.95/month and include up to five email accounts + you get a free domain name and one-click install WordPress hosting. Once you have a hosting account, you can use this guide to start using your email accounts.
Use this link to get a free domain name + hosting.
Once you’re sign up, you’ll need to do the following to create your new professional email address.
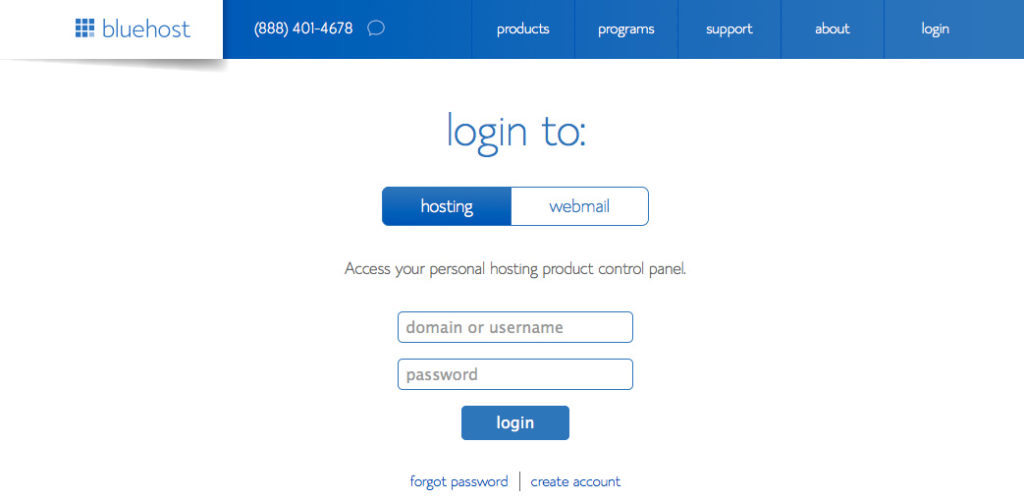
1. Log into your Bluehost Control Panel.
2. Hover over the “Mail” link and open the Email Accounts tool in cPanel. Once you are logged in, you will see a form with several fields including Email, Password, Password (Again), and Mailbox Quota.
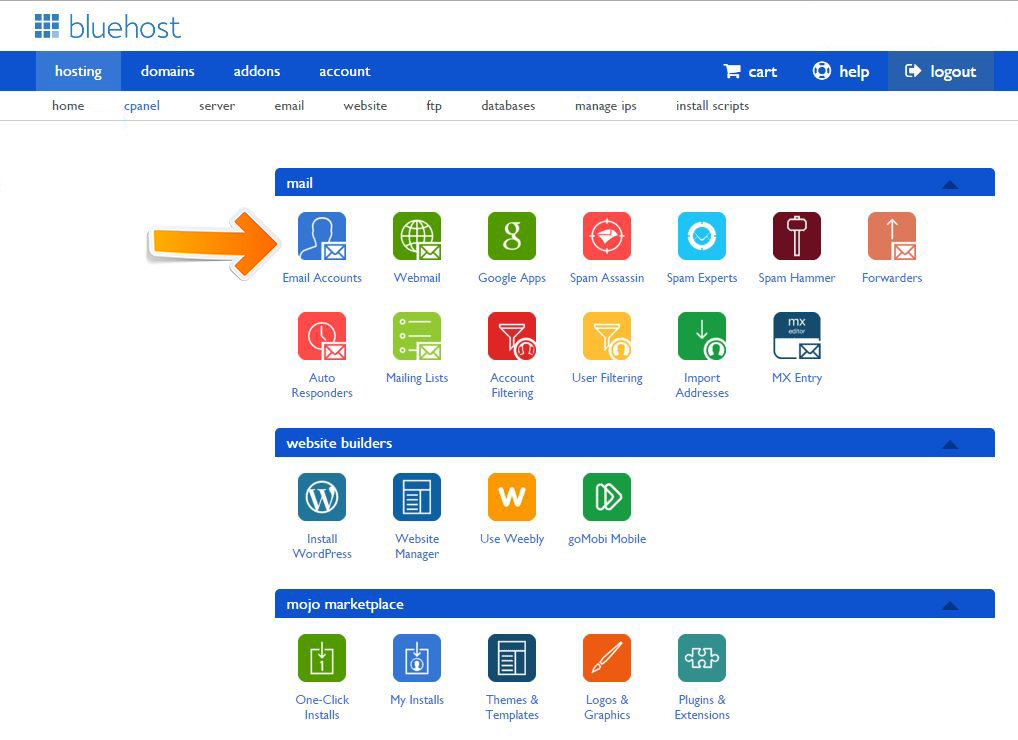
3. Start typing in the name for the email address in the Email box. If this is your first email, you can simply create one for yourself using your name like john@amazing-scooters.com or you can create a business use one like help@amazing-scooters.com.

4. Type in the password for this user and note the password strength. You want a really strong password for your business email addresses that includes multiple characters and numbers.
5. Type in a Mailbox Quota if you want to set a specific limit on the amount of storage that this user can handle. The default with Bluehost is 250 MB. You can increase this if you think it will be a public email address that receives a lot of traffic.
6. Click “Create Account” to submit and create your first business email address.
HostGator Business Email Step-by-Step Guide

HostGator is a WordPress hosting provider that offers amazing hosting packages that include business email. You can set up an unlimited email account with the starter package on HostGator for $3 per month. This also includes a free domain and unmetered bandwidth.
You will need to set up your HostGator hosting account first. You can purchase a domain name or transfer a domain name over to HostGator to start setting up your business email.
Use this link to get the discount.
Once you’re a paid memeber, you will need to do the following…
1. Log in to your HostGator account and click on the “Mail” section in cPanel.
2. Click “Email Accounts” to open up your email dashboard. You should see email, password, and mailbox quota fields.
3. In the email field, type in your business email that you want to create. Just like with Bluehost, this can be any kind of email address you want to start. You can always remove accounts later.
4. Enter a secure password and type again to make sure that it’s secure. Check the password strength if you are worried about security or spam problems. You can set up your spam filter later in cPanel.
5. Enter a quote in mailbox quota if you have a preferred limit. The default is 250 MB for HostGator as well as Bluehost.
6. Click “Create Account” to finish creating your first email account.
How to Use Your Professional Business Email Account
You are probably used to public, free email clients like Gmail, Yahoo, and Hotmail. However, Hostgator and Bluehost will have their own webmail section for you to log in and check your email address.
BlueHost Webmail
Bluehost and HostGator both have similar webmail applications that allow you to log into your email anywhere you go from your browser.
With Bluehost, you can access your webmail client by typing in bluehost.com/webmail.
You can also use webmail clients like Roundcube, Gorde, and SquirrelMail. These provide interfaces, IMAP folders, and calendars that you will not find with some of the other mail clients.
HostGator Webmail
There are two ways to access your business email account once you complete setup in cPanel.
1. Access through your cPanel dashboard.
2. Access via direct link.
To access webmail through cPanel, you will log into Hostgator and go to your hosting account, then click on Webmail.
It is much easier to log in and browse your email using the direct link. It is also a professional link that you can provide to employees. Hostgator sets up direct link webmail as follows:
Type in your web domain and at the end, add /webmail or :2095.
Example: www.amazing-scooters.com/webmail or www.amazing-scooters.com:2095
Type in your email address and password to open webmail and start browsing recent communications.
How to Set Up A Business Email Using Google Workspace ( formerly GSuite )
Another option open to you when setting up a business email is to use Google Workspace. In this section we will show you the benefits of using Google Workspace and how you can easily set up an account.
To this end, GSuite, which has rebranded to Google Workspace, remains one of the most potent tools for creating professionally customized emails.
In this section we’ll show you how to set up a professional email with Google Workspace.
Benefits of Choosing Google Workspace (formerly GSuite) to Create Professional and Customized Email Addresses
To be fair, Google Workspace ( formerly GSuite ) is not the only tool you can use to create professional and customized email addresses for your business. Today, the world is full of WordPress hosting companies that you could use for the same purpose ( As mentioned above with Bluehost and Hostgator ).
These companies guarantee you limitless customized email accounts.
However, Google Workspace trumps these companies and their services on many fronts. For example, it is not as unreliable, restrictive, insecure, and isolated as the other services.
Other than that, it’s also important to remember that Google Workspace ( formerly GSuite ) is just as much a product of Google as Gmail, which has close to 1.5 billion active email users per month.
As for Google Workspace, it boasts of a user base featuring more than 4 million businesses. Over 80 million educators and students also prefer Google Workspace.
Other benefits associated with this service include:
- Guaranteed professional email address for your business
- Insurmountable security and spam filters
- 30GB of storage, which is twice what you get from your free Gmail account
- Allows you to manage your emails even when you are offline
- Easily accessible anywhere on mobile, web, or tablet
- Grants each user up to 30 email addresses
How to Use Google Workspace (formerly GSuite) to Set up Your Professional Email Address
Now that you understand the many benefits of using Google Workspace to set up a professional email address, your next task is to sign up for this service.
To do this, you have to create a Google Workspace account.
Before doing that, however, you would need to be ready to pay a monthly fee of $6 per user.

Google Workspace offers you a free trial period of 14 days. Use this offer well to acclimatize to its numerous helpful features.
Do not forget to settle on your preferred plan too. Click the Get Started button under your preferred plan on the Google Workspace website.
The next step is to enter your preferred business name.
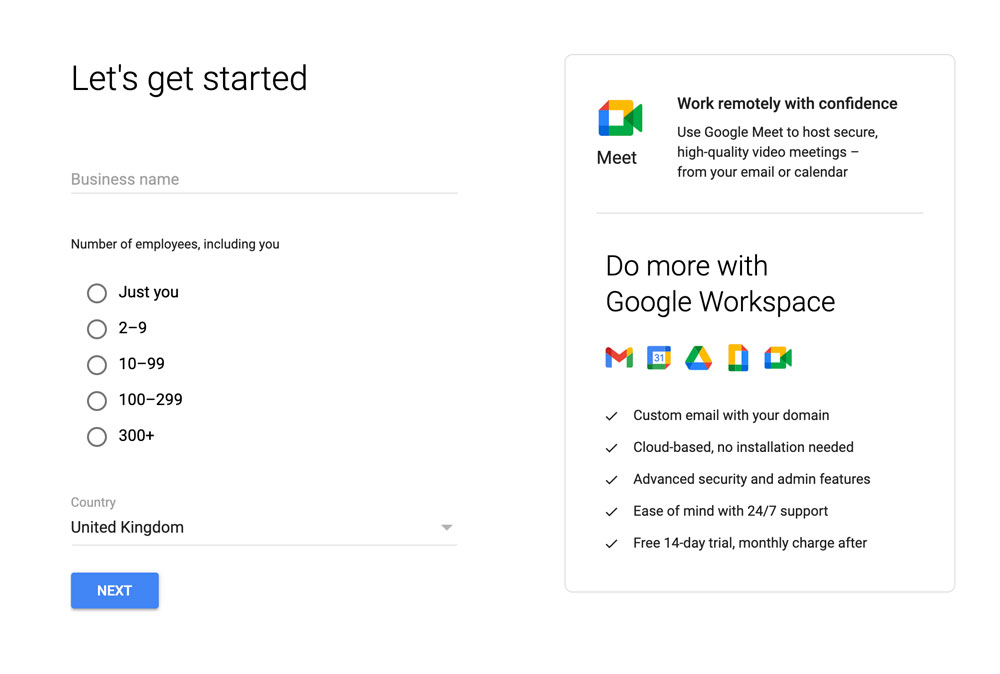
Input the number of employees working for you as well as your country location too.
Next step is to put in your personal contact details.
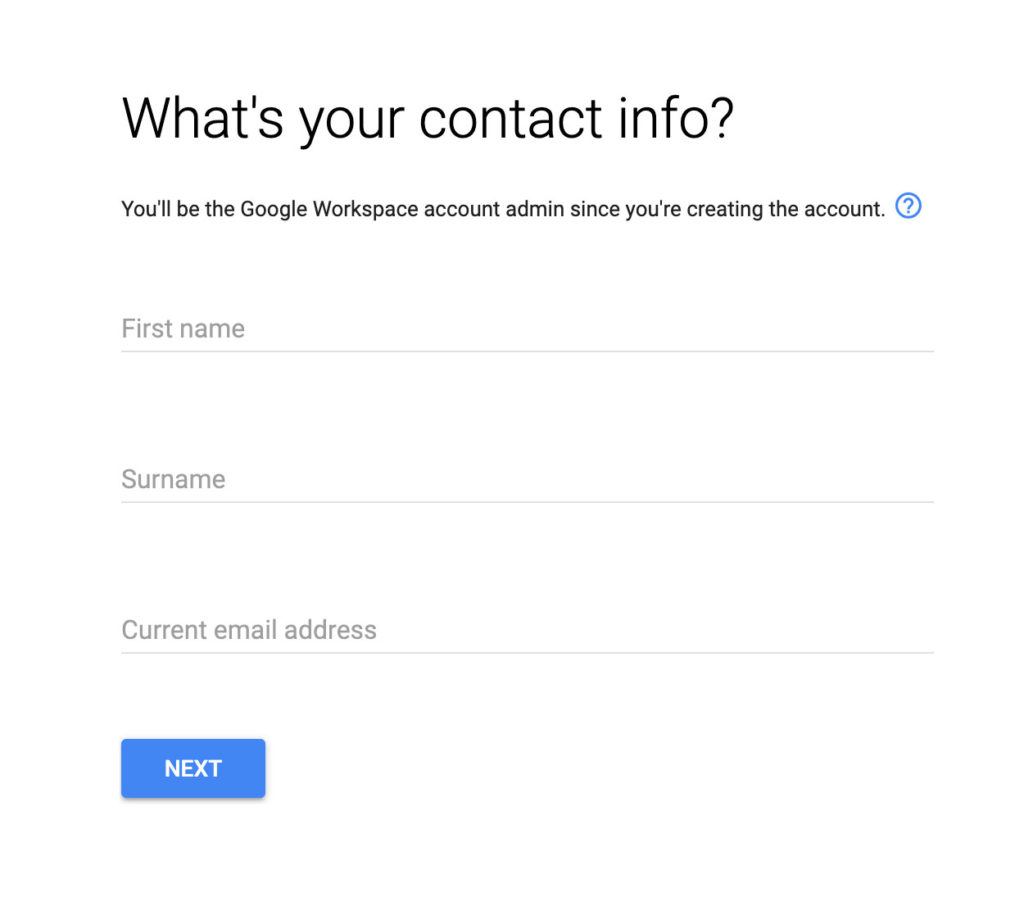
Remember to select a domain name on the next step too. Alternatively, use the one you already have.
Business owners who register new domain names have to pay a separate additional cost, though. Once you are through with all these steps, you should be ready to create your user account for Google Workspace.
The username you choose here would act as the initial professional email address for your business. Do not forget to choose a strong password too. With this in mind, it would be wise to select a username that you have no problem using as the business’ professional email address.
If you follow these steps faithfully to the end, you should have little difficulty in creating your Google Workspace account.
With that out of the way, move on to the “Go to the Setup” stage.
Here, you have the option of adding as many people or departments (depending on the size of your organization), as you want to your account. On the other hand, you could always postpone the addition of new accounts or departments to a later date.
You may be required to verify ownership of the domain name that you registered. Therefore, be ready with the information needed for this.
You will then receive a snippet of an HTML code. Make sure that you add this to your website.
Other ways of verifying that you own the website include:
- Using the FP client when uploading the HTML file to the site
- Using file manager app, which you can find on the dashboard of your hosting account
- Using the MX Record option in case you do not own a website yet
Nevertheless, this article assumes that you have a website, preferably one built with WordPress.
Then go to the admin section. Next, install the Insert Headers and Footer plugin, which also needs to be activated.
Go back to the section marked “Scripts in Header” under your Google Workspace account.
Copy the HTML code that you find in this section. Then paste it under the page labeled “Insert Headers and Footer” at “Settings” in your WordPress site.
Before getting out of this section, remember to “Save” everything you have done up to this point.
Be ready to visit Google Workspace one more time. Specifically, its setup screen still requires a little bit of action from you.
Mainly, you have to check the “I added the meta tag to my homepage” box.
You remember the MX Record mentioned much earlier? You have now reached the stage where you have to type the MX Record entries.
Nevertheless, it is worth remembering that MX Record entries are only necessary for those with existing websites and domain names.
Those whose domain names were registered through Google don’t have to enter the MX entries.
Be careful here to ensure that you only enter accurate MX Record entries. Otherwise, Google servers would have a next-to-impossible task of not only sending but also receiving your business’ emails.
It is easy to add these entries whether you are on Bluehost or other domain registers and hosts.
Therefore, log in to your Bluehost account. Then click “Domains”, which is under dashboard.
Choose your domain name when prompted to do so on the next page.
You will now see a link labeled “Manage”, which is close to DNS Zone Editor. Click that link and proceed with the required action.
Bluehost will open the DNS Zone Editor for you.
Before doing anything else, remember to return to the setup screen in your Google Workspace account.
Once there, confirm that you have opened the control panel of my domain name by ticking the appropriate box.
A list of the MX Record entries that you need to enter will appear.
A link documenting how you are to add these entries will also accompany the list mentioned above.
Remember to “Add Record” to save all the entries you enter.
Return to the setup screen on your Google Workspace account to confirm that you have indeed created all new MX Records.
Do not forget to delete the current MX Records that point towards:
- Your domain name register
- Your website hosting
You may be unable to do any of these, though, if you fail to return to the DNS Zone Editor and scroll your way down the MX section.
Delete the old MX records by clicking button next to them.
Then confirm that you deleted all existing records back on the setup screen of the Google Workspace account.
It is important to save the MX records. In some cases, this happens automatically while in others you might have to save them manually.
Lastly, you have to exit setup by clicking “Verify domain and setup email.”
How to Use Your Professional Business Email with Google Workspace
It is worth reiterating that the Google Workspace email works like any other Gmail account. For this reason, sign into your normal Gmail account.
Alternatively, you can access it through the admin console on Gmail.
Feel free to exercise your full admin powers by adding or removing users appropriately depending on the business’ needs.
Each of these users has a maximum storage capacity of 30GB. They also have similar features to yours. The only difference is they are unable to access the admin console.
How to Troubleshoot the Google Workspace Setup
Can the Google Workspace setup work seamlessly every day? Well, that’s not possible. Therefore, it is imperative that you know what to do in case problems arise.
More importantly, it pays to know a few troubleshooting tips that keep you from calling your webmaster every time.
Nevertheless, you have to stay in touch with the company that offers you web hosting services.
You may also find useful information by going through the document Google Workspace provides containing names of web hosting firms.
That same list also has names of the firms that provide domain registration services.
If you need information to help you troubleshoot some of these Google Workspace-related problems, then you will love the following section.
First, you need to understand that Google provides several powerful tools for solving most of the common problems Google Workspace faces. These include:
- Browser debugger
- DNS verification
- Encoding and decoding
- Log Analyzer
The beauty of it all is that these tools are quite easy to use. Therefore, you do not have to be an expert with years of experience and training to use them correctly.
Typically, though, the Google Workspace Status Dashboard has all the answers you need to some of the most common problems.
Before embarking on any troubleshooting, you could visit the dashboard first.
Social media, especially Twitter, features tons of useful information worth checking out when you want to troubleshoot the Google Workspace too.
At times, you could solve that annoying issue by switching to a different network or device or both.
Alternatively, consider visiting the Google Support page for more information on the known issues and their solutions.
What Should You Do Next?
Ultimately if you have a business today or about to start a business, you need to have a digital web address and professional email address that matches your brand. This is a way of separating yourself from amateurs and dangerous phish scams in the eyes of your customer.
Since domains are much cheaper and the process to set up an email account is much easier, many businesses are setting up their email accounts as the first step to creating their business identity. They are using these emails to send notifications, promotionals, B2B inquiries, and much more.
It’s time to set up your business email and spread your company message to the world! With business email addresses, you truly can open doors for your brand. You can communicate openly to customers and clients, empower your sales team, and make customer service teams really responsive to any inquiries.
If you are not sure how to get started after reading this guide, you can contact us for more information or talk to a technical support guide at Bluehost or HostGator. Both of these hosting providers are skilled at setting up business email accounts and may be able to take care of the setup for you, providing you with a direct link where to access your email going forward.
If you want more guides on how to build your own website or start your own blog, why not check out the following resources:
Jamie Spencer
Latest posts by Jamie Spencer (see all)
- How To Make Money As A Kid In 2025 – 6 to 16 Years Old - December 9, 2025
- 17 Of The Best Google Adsense Alternatives 2025 - October 13, 2025
- How to Start a Successful Cryptocurrency Website - September 12, 2024
Verizon has officially pissed me off. After 9 years with them I’m switching to tmobile
– They throttle before 22gb
– They require you to pay via checking or debit card to get the autopay discount (I lose out on cc perks)
– The most expensive wireless carrier
– Now the greedy bastards want to charge you just for seeing a face for activation.
They’re doing exactly what apple did and screwed themselves over.