Most blogs today started on Blogger.com or WordPress. Blogger was a fast, easy solution for writers looking to set up a functioning website with simple content management. However, many Blogger.com sites switched to WordPress in recent years. With thousands of responsive themes, various plugins, and ecommerce solutions like WooCommerce, bloggers have more versatility to scale their website.
In addition, Blogger.com makes money from hosting, maintaining, and owning your site basically. If you want to make money on your own through your own advertising, products, or sponsorships, then you will need that versatility to build your own website.
Switching to WordPress from Blogger.com is a step-by-step process that basically copies your posts into the WordPress platform. One thing to note is that this process includes hosting and getting your own domain name so that you have a professional website. We explain the costs and options below as part of the process to switching over.
Getting Started: One Click Migration Tool & A Few Warnings
Most people think you can just use the one-click migration tool to switch over, but that actually creates a few problems. However, there are a few things that many do not realize before going through this process. There will be some additional work necessary to fix issues and alert any current readers to the whereabouts of your new website.
If you currently get a ton of traffic to your website on Blogger.com, then you will need to inform readers that you have moved the site and provide the new WordPress URL. You might end up losing visitors if you do not have social profiles on Facebook or a post on your current site that informs people where to find the new website.
The one-click migration tool actually does not delete your Blogger.com site. It also does not update links that link to your old site. On your new site, you will need to fix links so that it links to your new site URL. This ensures that visitors stay on your new website and do not get confused by clicking on posts that link back to your old Blogger.com URL.
Since you’re changing to a new website, you need to do some additional SEO work to create a link between your old site and the new site. You will want to have multiple redirects in place, updating links on the old site to link to the new site, or simply creating content on your old site that directs people to the new site.
On the new site, you will want to incorporate the same SEO strategy as before and also create content that welcomes people to the new site. This will let Google crawlers tie the sites together and boost your new site’s SEO. However, you should take note that you will be starting over with SEO on the new site after the transfer.
One way to build your online presence with the new website is to a re-brand strategy. You can pick out a new logo, tagline, and content to support a new re-brand. By posting content on social media sites like Facebook, Pinterest, Twitter, and Instagram, you can market your new website to gain a new following.
But don’t just stick to social media marketing!
Many bloggers also incorporate a newsletter sign-up post so that followers can sign up to get a notice about the move and get content delivered right from your WordPress site. The email sign-up also gives you the ability to email your followers when new posts and products are posted on your new website.
Step-by-Step Guide to Move from Blogger.com to WordPress.org
If you want to migrate without having to deal with the loss of users and SEO, then there is another process that allows you to keep your links, followers, and search engine prominence.
What You’ll Need
1. Domain
2. Web hosting
3. WordPress installation
Step 1: Find a Good Web Hosting Provider
You will need to purchase a domain name and hosting from a hosting provider to continue with this transfer option.
While there is a free version of WordPress, it is not the best way to keep all of your content nor will it give you the most scalability.
BlueHost
HostGator
DreamHost
A2 Hosting
Liquid Web
These are some reputable web hosting providers that have WordPress hosting or cPanel with one-click WordPress installation, as well as decent rates on monthly and yearly hosting.
Hosting will allow you to create a unique database and content on your own terms, which is why we are moving from Blogger.com to WordPress.org in the first place!

Real quick: how to know what’s a good web hosting?
Web hosting providers should provide different packages that provide bandwidth, storage, and control panel applications. For example, with Bluehost, you can purchase shared hosting for as cheap as $2.95 per month.
Quick Guide to Hosting Options
Shared Hosting has lower traffic capacity and less scalability. You share a server with other websites and may suffer downtime.
Dedicated hosting allows for higher traffic but costs more. You essentially purchase your own machine to store and run your website.
VPS or Cloud hosting gives you a larger, scalable machine that may share with others but consistently delivers 100% uptime due to using cloud resources. In this model, you only pay for the storage that you need. However, it can be costly if you have sudden boosts in traffic.
Step 2: One-Click WordPress Installation
Installing WordPress is easy with any of the aforementioned web hosting providers because they offer one-click WordPress installation. This process takes seconds to complete.
Once you have purchased a domain and hosting through a hosting provider, you can click within the menu to find WordPress installation guide or go to your cPanel. Within cPanel, you can go to the application browser and select WordPress to install.
You simply choose the path that you want to install on, which should just be the main root of the website unless you wanted to install a WordPress blog on a sub-domain like blog.yourwebsite.com or yourwebsite.com/blog. This is only beneficial if you plan on building the rest of your website in HTML or another platform like Magento.
You will also need to set the username and password for the WordPress admin. You want to pick a strong password. Once you’ve entered all the details, click “Submit” to finish installation.
The application browser will install the WordPress files on your website in less than 60 seconds. Once finished, you can access your new WordPress site right away by logging in. It will take your to your dashboard. You can see how pages, posts, media libraries, plugins, widgets, settings, and themes work by just clicking on the left sidebar menu.
You can set up a new theme and plugins after you have imported your Blogger.com site.
Step 3: Import Your Blogger.com Site to WordPress
All of your content on Blogger.com still needs to be transferred over to the new website. Each step can be performed within your WordPress dashboard after you login. You do not have to login to Blogger.com at all to complete this step.
Once you have logged into your WordPress site, click on the “Tools” tab within the left sidebar. This will bring a few different items as follows:
Available Tools
Import
Export
Click on “Import” to get started with the transfer. A new page will load with different import options. You should see a Blogger link at the top, but the list will look like this:
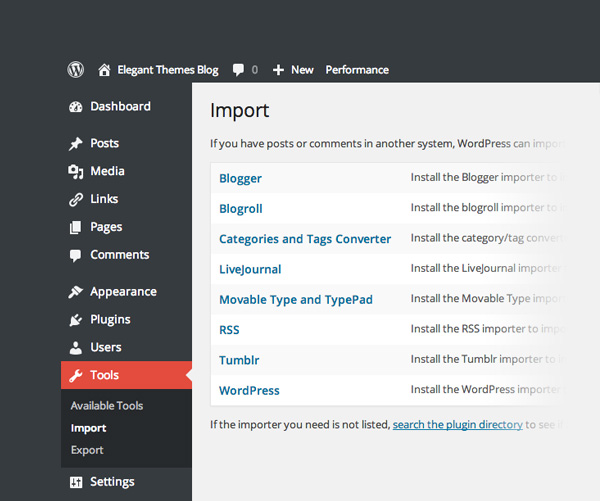
Click on “Blogger” to install and active a new plugin. This plugin is called the Blogger Importer and will assist in moving all of your content over to the new website. After clicking on Blogger, click on install and then click “Activate and Run” to finish. It should show up after a second.
Blogger Importer is a nifty plugin that will import your categories, posts, comments, and images. However, you should take note of things that will not be imported:
- Pages
- Widgets/Widget Data
- Templates/Theme
- Comment and author Avatars
Click on the “Authorize” button with the Blogger Importar to start the transfer process. You will have to enter some information about your Blogger website so that WordPress can authorize the transfer. This takes you to a page that will connect with a Google account for which your Blogger account is hosted on. You should use the Google login that you use with your Blogger.com site to finish this process.
Once you have logged into the right Google account, click on “Allow Access” to give WordPress to transfer the site over. It will ask to “Manage Your Blogger Account.”
After clicking “Allow Access,” a new page will load with a list of all the Blogger sites that you have associated with the Google login. Click on the Blogger.com site that you want to transfer to WordPress.org. A widget should pop up with the images, posts, comments, and links. There will be an “Import” button on the right.
Basically you want to make sure that all of your posts, comments, images, and links will be transferred over on this page. If you see “0” in any of the boxes, you should go back and check that you clicked the right account before moving over the site or you may not import the right content.
Click on “Import” to finish the transfer.
Now Blogger Importer will import the content over to the new WordPress site. It will also ask to create a new user to publish the content under. This should be a staff name or something specific that will be easy to remember later.
Now that you have transferred the essential content from your site, you also want to make sure that SEO has not been affected by your move and keep your users on the same page.
Step 4: Set Your Permalinks Correctly
For this step, navigate back to your old Blogger.com site and click on any post or page to see its permalink structure.
A permalink is the URL in the browser that sets up the structure of your website. Some websites have numbers and dates in the URLs, while others use categories or just post titles. You will want to note how your permalinks are set up so that you can build the same structure on your new website within WordPress.
The best way to do this is to make sure that your site looks identical in URL structure to your Blogger.com site. This can help search engines tie the two together and carry SEO rankings over from your old site.
To set up the permalinks of your new site, go to the left sidebar within your WordPress dashboard and click on “Settings.” Under Settings, you should see a screen like this:
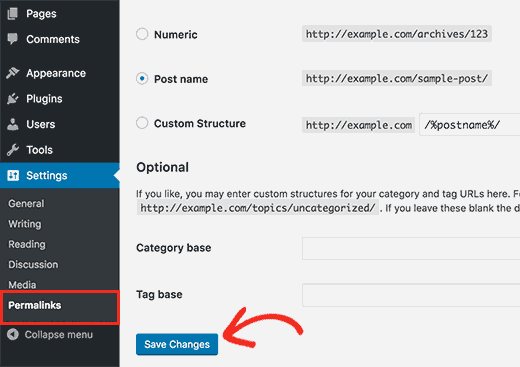
Click on “Permalinks” to continue.
This page lets you manually set up how you want the structure of your site to look. Most Blogger.com sites have month and name formats for the URLs. To carry over SEO, you will need to select the same structure for your new WordPress site.
You can find “Month and name” setting under Common settings within the “Permalinks” menu.
Once you have set your permalink structure, WordPress will adjust your content. This should help SEO crawlers find your content and match it to your old site, giving you the best chances of keeping your SEO intact without any effect on your ranking.
However, there is still one more piece to maintaining your SEO and directing followers to your new website.
Step 5: Set Up Redirects to Maintain SEO and Visitors
Despite using Blogger Importer and Permalinks to maintain your content and SEO, your users will have very little knowledge of the move on their own unless you notify them somehow. However, you can do something to make it easier to find the website.
Up until this point, your users would still go to Blogger.com website and not be able to see your new content. Ths same goes for search engine crawlers. Google crawlers simply assume that you have stopped using the old site and will devalue the domain’s authority over time.
This is simply because WordPress site is completely new and hasn’t built up the same SEO reputation as the old site.
If you believe in using SEO to promote your website and rank up in search engines, then you know how detrimental it can be to keep your traffic.
You can use redirects to maintain your SEO and keep users.
Setting up redirects is a simple process that every site owner has to do when they switch over to a new domain and want to keep SEO. There are two types of redirects that are used in this process:
The first redirect type sends people to the new site from your old Blogger.com address.
The second redirect sends visitors to the right page if they click on a page within your old Blogger.com. If they click on the “Contact” page for example, you will want them to land on your new contact page to get the right information.
To get started with redirects, log in to your old Blogger.com site’s dashboard.
Once logged into your old site, click on “Template” on the left side of the dashboard. It will load a menu. Move down to the bottom of the page and click on “Revert to Classic Templates” link.
This will change the look of your old website and will take away access to the template designer included with the new Blogger.com version. However, you will not need these tools because you already have the new site. By reverting, you gain access to redirects that will allow you to boost your new site’s SEO.
If done correctly, the redirects will take visitors directly to your new site even when they try to navigate to the old site. Essentially, visitors will not be able to see your old site at all.
Scroll down to the “Edit Template HTML” area. You will need to modify this code in order to set up the redirects properly.
Click within the Edit Template HTML area and then press CTRL+A to select all the code in this area. Once you have highlighted all of this text, then you can replace it with the following code:
<html>
 <head>
  <title><$BlogPageTitle
gt;</title> <script> <MainOrArchivePage> window.location.href="http://example.com/" </MainOrArchivePage> <Blogger> <ItemPage> window.location.href="http://example.com/?blogger=<$BlogItemPermalinkURL
gt;" </ItemPage> </Blogger> </script> <MainPage> <link rel="canonical" href="http://example.com/" /> </MainPage> <Blogger> <ItemPage> <link rel="canonical" href="http://example.com/?blogger=<$BlogItemPermalinkURL
gt;" /> </ItemPage> </Blogger> </head> <body> <MainOrArchivePage> <h1><a href="http://example.com/"><$BlogTitle
gt;</a></h1> </MainOrArchivePage> <Blogger> <ItemPage> <h1><a href="http://example.com/?blogger=<$BlogItemPermalinkURL
gt;"><$BlogItemTitle
gt;</a></h1> <$BlogItemBody
gt; </ItemPage> </Blogger> </body> </html>
Make sure to replace www.yournewsitename.com with the URL of your new WordPress site or this process will not work.
You can replace all of these instances using CTRL+F and using the replace function.
After you paste the new code and update the site name, click on “Save Template” to save changes.
Now, search engines and users will be sent directly to the new WordPress site even if they try to navigate to the old homepage.
However, if you want to prevent them from being able to go to other pages on your old site such as About and Content, then you also have to set up a new code file using Notepad.
Creating Redirect File in Notepad
You can use any HTML editor, but Notepad is the easiest application for saving this file type.
Once you’ve opened Notepad, copy and paste the following code into a blank notepad, then save it with a .PHP extension.
function blogger_query_vars_filter( $vars ) {
  $vars[] = "blogger";
  return $vars;
}

add_filter('query_vars', 'blogger_query_vars_filter');

function blogger_template_redirect() {
  global $wp_query;
  $blogger = $wp_query->query_vars['blogger'];
  if ( isset ( $blogger ) ) {
    wp_redirect( get_wordpress_url ( $blogger ) , 301 );
    exit;
  }
}

add_action( 'template_redirect', 'blogger_template_redirect' );

function get_wordpress_url($blogger) {
  if ( preg_match('@^(?:https?://)?([^/]+)(.*)@i', $blogger, $url_parts) ) {
    $query = new WP_Query (
      array ( "meta_key" => "blogger_permalink", "meta_value" => $url_parts[2] ) );
    if ($query->have_posts()) {
      $query->the_post();
      $url = get_permalink();
    }
    wp_reset_postdata();
  }
  return $url ? $url : home_url();
}
You can name this file anything you wish, but it’s best to create a memorable file name. For this example, we will use redirect_site.php to save this text file.
Once this file is created, use an FTP client like Filezilla or go to your File Manager in cPanel to access your Public_HTML root. This is where your theme files are stored for your new WordPress site.
After logging into your FTP or File Manager in cPanel, locate the theme directory path and upload the file into the directory that you saved from Notepad.
Login to your WordPress Site again and click on Pages.
Create a new Page and name it “blogger” without any quotations or capitalization. This is important as it will allow your old site to redirect all pages through the file just uploaded into theme directory.
Once you have got the new page open and have typed in the name, look to the right side and find “Page Attributes.” This will provide a “Templates” menu dropdown when clicked. Click on the menu to find the name of the blogger PHP file you saved from Notepad.
Select the template from the list and click “Publish” just above the “Page Attributes” area.
Now serach engines and users will land on the correct pages when they try to navigate to your old site. This keeps your following and SEO intact!
Now you can enjoy your site on WordPress!
Jamie Spencer
Latest posts by Jamie Spencer (see all)
- How To Make Money As A Kid In 2025 – 6 to 16 Years Old - December 9, 2025
- 17 Of The Best Google Adsense Alternatives 2025 - October 13, 2025
- How to Start a Successful Cryptocurrency Website - September 12, 2024